Sunday, November 03, 2013

Singer 500 and 503

You may remember the Singer 503a that Jane used for parts to fix up her 500a.


When the smoke cleared, she had no need for a 503 carcass, so she left it for me to use as a parts donor.  Looking at my collection of 500 series slant-needle machines, I see that I have three 500s and no 503, so I think I will sacrifice one of the 500s to build up the 503 and fix some of the other 500s.


From left to right, #1 has a broken bobbin winder spring and a bad light socket;


#2 has a badly chipped nose door,


and #3 is in the least desirable cosmetic condition, with a serious paint scrape beside the stitch length lever and significant wear on the leading edge of the bed. So, it looks like #3 is going to sacrifice a bobbin winder spring and light assembly to #1; a nose door to #2 and some other parts to the 503.

However, that still leaves me short a nose door for the 503 if I don't want to use the one that is badly chipped and a bobbin winder spring. Years ago, I stripped a rusted-out 503 and kept many of the body parts but I can't find them in my mess.  If I don't find those parts, I will have fodder for two more blog posts - repairing the hinge on the nose door and making a bobbin winder spring.

Wednesday, October 16, 2013

I'm Afraid to Open This Featherweight

The covering is coming off the box, both latches are broken, it is held closed by an old belt and the owner warned not to pick it up using the handle.


Well, lifting the lid was a pleasant surprise - a nice assortment of accessories


 including a hemstitcher with all the associated parts.  You often find these missing the special needle plate.


  Now to look inside OH NO!!! IT'S MUMMIFIED!!!


  Turned out that was just a homemade cover to protect the machine below.  Not that there was much to protect, it has seen lots of use over the years.


The cords had been replaced and the power cord was a full twelve feet long. I wonder if they were plugging it in to the neighbor's wall socket. On further inspection, I see a bit of dirt but no rust, thank goodness.


Cleaning and some Oil and grease got the old gal to spin freely and some minor tension tickles and it sews like it's supposed to.


By the way, you always clean before you lubricate.  If you do it in reverse order, you clean out some of the new oil/grease with the lint.

Not a lot of mechanical work to be done, a new motor belt, new bed cushions and new cushions on the foot control were all the parts needed.

Sunday, October 06, 2013

Singer Genie 354


  I picked up this machine a few weeks ago while I was in New Hampshire to attend my 50th high school reunion. It is a Singer model 354, known as the Genie.


  Not quite the vintage or quality I normally like, but since it was the supposed successor to the Featherweight, I feel it is a "Milestone Machine" and I really should have one in my collection.


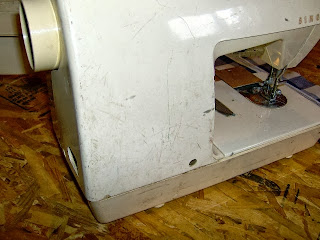
  You can see from the views of the exterior, it has led a rough life but I believe it has only been used for mending.  Why do I say that?


 The single bobbin that came with the machine had ELEVEN different colors wound on it - cream, orange, red, purple, light red, dark red, tan, orange, tan, green, and white. Some pieces were so short they could not be seen until I unwound the layers above them.  No decent sewing project could be sewn with those little bits of thread.

  It is missing a few parts, the tough one is going to be the trim piece beside the take-up lever.


If anyone has a Singer 353 or 354 parts machine, I would like to talk to you about this item. It is also missing the plastic cover to the clutch release but the 6620C I just acquired has one I can cannibalize - probably the only part on that machine I can use!

Tuesday, October 01, 2013

Janome Jem 639 and My New Favorite Cleaning Aid

  On my weekly stroll through the local thrift shop, I spotted a sweet little Janome Jem just waiting for me to take it home.  It appeared to be in good condition, the foot control, presser foot, and bobbin case were present so I picked it up in hopes that one of the local quilters would be willing to give me a little more than I paid for a lightweight machine to carry to sew-ins and classes.


  When I got it home, I found it was not just in good condition, it looks like it has never been used!  The sticker on top showing how to wind a bobbin was not even smudged.


  It needed no repairs or adjustments, it sews like right out of the box! The package of three needles that came with the machine is unopened.  The only attachment that came with it was a buttonhole foot, there probably should have been a zipper foot, at least.

  The one detracting feature was the price - written in magic marker on the plastic case.  In the past, I have used headlight lens restorer to remove magic marker from plastic but the headlight lens restorer was downstairs and I was upstairs, so I grabbed something else to try, a magic eraser.


  I had never used one of these but picked one up at the Dollar Store to clean our fiberglass shower stall.  It worked fine there, so I have been trying it out on other surfaces - tile grout, vinyl flooring, metal sewing machines - all with excellent results.  I was hesitant to use it on this shiny plastic machine, fearing it might leave scratches or leave a shadow of the Sharpie price mark.  It cleaned off the mark completely and left nary a scratch in the plastic.


 Now a word about Janome Customer Service. I emailed them asking for a copy of the 639 instruction manual.  Within 6 hours, I had a return email with a pdf attachment titled "639.pdf" but when I opened the file, it was for a 693, not a 639.  I emailed them again and within 6 hours had another return email with the proper instruction manual.  Thank you, Janome Customer Service.

Monday, September 30, 2013

Jane's Singer 500 Part II

I swapped motors with the 503 and the 500 quieted down somewhat.  The problem now was that the upper lid would not stay open.  The spool pins on a Rocketeer are under that top lid, so if the lid keeps slamming down on the thread spools while you're sewing, your finished product is going to be compromised - if you don't just throw the whole machine out in the back yard.

I looked at the springs that hold the lid in place and everything looked fine


UNTIL I held the 503 lid next to the 500 lid and realized that a spring on the 500 is broken.  It's such a smooth, square break that it looked like it should be that way.


I cannibalized the spring from the 503 and the lid now stays up.  I wish I could swap the whole upper plate, complete with hinged lid but the 500 and 503 top plates are not interchangeable.


I still haven't threaded it and sewn anything, maybe this evening.

UPDATE:  It Sews!


It only required some major tension cleaning and adjustment - both upper and lower.

And here's what the "Parts Machine" looks like


Sunday, September 29, 2013

Jane's Singer 500

  Last week, Jane from LuckySewandSew emailed to say she would be bringing me three vintage sewing machines on Saturday to work on.  Her car must serve double duty as an incubator because when she arrived, there were not three, but four machines in there!


  She did pretty good for a beginning vintage SM collector - a Singer 99k handcrank she picked up in Scotland, a Singer 500 Rocketeer, A Singer 503 Rocketeer and - my favorite - a Necchi Supernova Ultra. Most collectors start with Japanese clones and work their way up to the Rocketeers and Supernovas but Jane didn't waste time, she started right at the top.


  I let them sit overnight because I had some boat curtains to finish and I just couldn't decide which one to start on.  Today, with a clearer head, I put the 500 on the bench because that looked like the one needing the most work. It has two of the three most common ailments afflicting the slant-needle singers, a broken hinge on the nose door and a broken bobbin winder spring.  The third is frozen cam selectors.


 It also had a wad of electrical tape the size of a golf ball on the power cord.  Fortunately, the 503 had been designated as a part donor and it had all three of the broken parts in good condition. After swapping the foot control/power cord, door and the spring, I swapped some cosmetic pieces - the upper lid, the lamp shade and a few more.  I have it looking pretty good.


Next, I plan to swap out tension assemblies and possibly motors.  The motor runs okay but is a bit noisier than I like. I haven't yet tried sewing on it, I am letting the new oil soak in tonight and will continue tomorrow.  More to come....


Thursday, September 26, 2013

Singer 6620C

  A friend picked this machine up at a local auction.


 Before giving it to his granddaughter, he asked me to check it out and make sure it is functional.  We knew right off the bat that the bobbin case is missing but they are available new and not too expensive. In fact, I have a used one in the parts bin. The machine was making an intermittent grinding noise when running and watching the feed dog, it appears to be stuck in stretch stitch mode, regardless of the position of the selector knob. I couldn't immediately isolate the cause of stretch-stitch-only mode, so I started looking for the grinding noise. Turns out the vertical gear in the upper section has a LARGE crack and its mating gear was skipping a few teeth every time it came around to the crack.


That gear is so far down in there that much of the mechanics above it would need to be removed and reinstalled - a task I was not looking forward to. I did remove the camstack to get a better look at the cracked gear and found that the camstack gear is also cracked.


After discussing the cost of repairs with the owner, he told me to just keep it for parts or dispose of it.  I don't normally work on machines this new and there is no need for me to find a place to store parts that I will probably never use.  So, I am offering the parts to the readers of this blog.


There are lots of good plastic parts - all the panels, the slide-on bed extension, power cord, knobs.


As for internal parts, the motor seems to run fine and everything else looks good. If you want anything, email me at oldsewingmachines@gmail.com and we can work something out. I got it for free, all I have invested is time so all I will want for any parts is postage and a little to cover the cost of packing materials.  I will keep the machine until October 12 to give everyone a chance, then on the 13th, it goes to the dump.

Thursday, August 29, 2013

Useful Tool for Servicing Vintage Sewing Machines

I learned of these curve-tip syringes on an internet sewing machine forum. Folks there were using them to hold oil and grease to service their old, all-metal machines.


If you service your own machines, you know that there are places you just can't reach by ordinary means.  For instance, there is a gear under the camstack on Singer 401/403/500/503/600/603 machines that NEVER gets greased because it involves removing the camstack.


Removing is not the hard part, it's re-timing the camstack after installation that's the time-consumer. For 20 years, I have been removing the camstack, now I learn that the gear can be greased in seconds using one of these curve-tip syringes!


The tip comes with a very small hole, you just snip off a little at a time until you get the size opening for the task at hand - small hole for oil, larger hole for grease.

I got so excited, I went out and bought 50 of them!  Because, at my age, I will never wear out 50 syringes, I am packaging them in lots of four syringes and listing them in our Etsy Shop for $5.00 per package.


The shop is brand new, so at this point we are shipping only to the U.S. but might expand that later, if business is good.  I also intend to list other new and used vintage sewing machine items in the future.

Wednesday, July 31, 2013

Auction 201 Update

Progress has been slow on the 201 because we are gearing up for craft show season. I spend the majority of my spare time making wrist wallets and table runners and get very little time to tinker with sewing machines.

I learned that the bobbin winder kickout spring is broken and the bobbin winder rests on the balance wheel all the time.  I didn't have a spare spring but they are available on the internet for $4.25 plus shipping or $9.99 with free shipping.  The price was a little bit of a deterrent, since I only paid $12 for the machine, I hesitated to spend another $10 on a measly little spring but the  major issue was that I would have to wait for it to be shipped.  The spring is a very simple affair, just three coils of spring wire with a bend on one end and a 1.25" leg on the other so I surfed the internet for instructions how to make a spring.  Lowe's sells a package of four assorted sizes of spring wire for $2.98 and I picked up a pack.


. Each piece is only 6 inches long and I needed 4.5 inches for the spring, Knowing I would only get one shot, I got some fishing tackle with piano wire at Wal-Mart to make some prototypes by winding the wire around a bolt..  


  The fourth prototype fit but the piano wire is not strong enough to keep the bobbin winder suspended when the machine starts running. This evening, I made a spring using the Lowe's spring wire and it works fine.
  While unsuccessfully searching my spare parts boxes for a kickout spring, I encountered a stroke of good luck - I found a 201 terminal block!  I was already prepared to manufacture a box to contain the light switch but the switch I got at Lowe's fits just fine in the 201 terminal block.  I got this box of 201 parts about 20 years ago from a lady who had parted out some 201s and wanted to reclaim some space in her garage. That's why I hate to throw anything out, you never know when you might need it.
 

  I was pleasantly surprised when I installed a fresh needle and the machine made an almost perfect stitch on the first try.  A little tweaking of the upper and lower tensions and it now sews like a Singer 201 should. 

 When it's running, it still has a little buzz that shouldn't be there but seems to be lessening with use.  If it doesn't go away soon, I will break out my mechanic's stethoscope and track down the source.  Here's the almost-finished product.


Now that I see the photos, it appears I still need to do some more cosmetic restoration (cleaning). Honestly, it looks better in person.

Monday, July 29, 2013

Garage Find - Domestic

I bet you think I meant "Garage SALE Find" but it's not. Yesterday, I was cleaning out my garage and saw a sewing machine case behind some plywood leaning against the wall. I thought it was just an empty case but it turned out to have a Domestic sewing machine in it.


  My daughter found this machine at a thrift shop for $8 and picked it up for me as a gift.  I cleaned and oiled it when I got it but haven't used it since.  We have lived in this house for three years and it has been stored on the floor of the garage all that time but when I plugged it in, it ran as smooth and quiet as a Necchi.  With the left-needle position and having an end-loading bobbin,  I put it early in the zig zag era, probably late 1950s or early 1960s.

  I'm curious what was sewn on it previously because most of the paint is in good condition but there is a big chunk and several chunklets missing from the vertical pillar, inside the throat. What could cause that type of damage?


  I used the machine for a project last night and the only problem is that the motor does not start immediately when depressing the foot control. Thinking this might be caused by corrosion in the foot control, I opened it up and cleaned the contacts but that did not cure the problem.


  Next, I pulled off the end cover to make sure the belt was not too tight but it wasn't.  The mechanics are free moving, so it doesn't need lubrication, I guess my next move will be to pull out the motor and check for dirt on the commutator.