Friday, December 04, 2015

Adjustable Zipper Foot


Browsing through some orphan boxes of accessories, I found a presser foot I had never seen before.  It is an adjustable zipper foot but it is different.  All my other zipper feet have one toe


This one has two toes with a slot in the middle between the toes.


It can sew on the left side


or on the right side


or straight stitch in between the toes. 


And you don't have to change the foot to sew zippers, piping, or anything else you would use a zipper foot for - just loosen the thumbscrew in the back and slide the foot to the desired position.  I can't believe that, with all my years of collecting sewing machines, I have never before seen a foot quite like this.

This provides a much better product when straight stitching because the foot spans both rows of feed dog, not only one row.  Fabric should feed straighter and more evenly with twice the feed dog contact.

I have been using this foot on my Anker RZ for all the sewing I do on that machine except zig zag. The only foot I have is high shank and the only high shank machine I have out and set up for sewing is the Anker so it was a natural pairing.

Since I like the foot so much, I searched for a source so I could add them to the inventory of my Etsy shop.  I have found them in high shank, low shank, and Singer slant shank. 

Ed
Ed's Vintage Sewing Machine Shop


Tuesday, November 10, 2015

Pfaff Hobbylock 774

Last week, a lady brought her Babylock Pro-Line serger by for a cleaning and to have the knives replaced. 


The machine had been sitting idle for some time and had gotten stiff, so I had to go fairly deep into it to restore lubrication to all the moving parts and had to resort to YouTube for instructions on adjusting the new knives because I had never replaced knives before.

That got me in the mood to tackle one of my three seldom-used sergers to see if it was still in working condition.  I made the choice which one to work on by turning the balance wheels.  The Brother and the Babylock both turned freely


but the Pfaff was frozen solid - I couldn't turn the wheel at all!


I picked up this serger fairly cheap because it had significant rust.  You can't see much of the rust in these photos because (a) I have cleaned some off and (b) the really serious rust is inside where you can't see it.


 I wish I had taken photos when I had all the covers off but I got too impatient to see if it was fixed to go get the camera and take pics.  Threading a serger is difficult enough that I was not going to un-thread just for a photo op.

The biggest problem (after oiling and freeing up the mechanism) was that the lower looper timing was way off.  All I got was a series of parallel needle holes on the fabric with no interlocking thread at all.  Fortunately, I had a service manual for the Hobbylock 794 which was close enough to provide all the necessary adjustments and clearances.  The serger now works the way it should, even if it is not the prettiest one I own.


Even though I rarely use a serger, I felt this effort was worthwhile because I learned a lot about how one works.  Before this, I thought there was a little magic box inside the case that made all the fancy stitches happen - now I know it is just a bunch of levers and bellcranks and it no longer mystifies me.

Ed's Vintage Sewing Machine Store

Tuesday, October 20, 2015

Kenmore 385.1684180

Even though it has the slide plate that turns under the seam allowance, I really like my 385.17881 Kenmore because it is so smooth and quiet. 


I always consider those traits to be an indicator of the quality of the machine.  Unfortunately, when I got it, the stitch length dial was very difficult to turn and I tried to loosen things up with a heat gun, melting some teeth on the plastic gear behind the stitch length dial.  I was able to reposition the gear so that the missing teeth were  not where they would affect stitch length selection, but the dial still turns very hard and I only have stitch lengths of 10-12.  I have been looking for a replacement for that machine, hoping to find the exact model needing work so I could cannibalize parts from my current machine to rehab the new one.

I still haven't found the exact model replacement, but I saw this 385.1684180 on an online auction.


 The style lines are very similar to the 385.17881 and it has the same rotating hook and drop-in bobbin, so I bid on it, hoping it would be as smooth and quiet as the 385.17881.

When I received the 385.1684180, I saw that it appears to have been well-used, but not abused.  The light bulb was burned out and the plastic bushings that hold in both spool pins are broken.  Sears Parts Direct had the bushings in stock and they are on the way to me.  The bobbin area was very clean, making me think the machine had been well cared for, but when I opened the bottom covers, a lint ball the size of a plum fell out!  It had been cleaned from above, but never went in for a professional servicing.  There was also a lot of gummy substance on many of the surfaces underneath, including the hook gear.  I tried to clean it off with mineral oil, alcohol, and several other substances but scraping it off seemed to be the only way to remove it.

Those issues  were easy to fix but one was more difficult - it would not stitch in reverse.  Pressing the reverse button had no effect, it just kept going forward.  Tracing out the linkage from the Reverse button, I found that there are two springs and a collar that slides along the hook shaft. 


When the collar is to the right, the machine sews forward.  When the collar slides to the left, the feed dog travel is altered so the fabric feeds in reverse. 

Here's how it works:
    The spring near the Reverse button (not shown in these photos) is stronger than the spring down by the collar (in yellow circle).
    When the Reverse button is pressed, the weaker spring is allowed to slide the collar (in the red circle) to the left for Reverse.
    When the Reverse button is released, the stronger spring pulls the rod (in blue) and overrides the weaker spring and slides the collar to the right for forward sewing.

  I could feel that the collar was not moving freely and spent two days trying to free it up.  After lubing and exercising the collar and hook shaft for hours with no results, I accidentally knocked the arm from the weaker spring out of its track and found that the collar itself was actually free-moving, it was the arm from the weaker spring to the collar that was binding.  I had oiled the pivot point of that arm in the very beginning but that was not enough.  I removed the arm and spring, cleaned everything well and re-lubricated.  The Reverse button now works as advertised and the machine sews backward as well as forward.

 FORWARD

REVERSE
 
 
Ed


Thursday, September 17, 2015

Singer 20U33


  I have an industrial 20U33 that I like to sew on.  It is smooth, strong, and quiet and makes a perfect stitch.  It also has a 9mm zig zag, which I rarely take advantage of but I know it's there if I need a wide zig zag.
I have had it mounted in a power stand from a Singer 95-10 that went away years ago.


  I like the table because of its solid wood top that I intend to refinish some day and the flip-up leaf that extends the sewing surface.  Problem is, the ancient clutch motor has four wires protruding from it and I can find no documentation how to hook up the wires to make the motor operational.


  To substitute for the missing clutch motor, I installed my largest family machine motor - a 1.3 amp model from a White.


  The treadle did not allow the foot control to be positioned in a comfortable location so I wedged it under the far end of the treadle and depress the treadle to actuate the speed control, just like I would if the clutch motor were working.


  This setup allowed me to sew but there was no light.  I tried a stick-on LED light but it did not provide adequate illumination in the proper direction. 


  A tabletop Ott Lite provided illumination but I was constantly knocking it over.
To the rescue was a Singer 252


with a broken plastic gear in the upper section.


   I was able to find a replacement gear but see no way to replace it without removing the main shaft - a task I do not wish to undertake - so it is now a parts donor. 

  The first donation was the foot control, motor and attached light.  They fit perfectly on the 20U33 and I now have a machine I like to use with enough light to see what I'm doing.


Ed
 

Tuesday, September 08, 2015

Singer Auto-Reel


  This week, I had the pleasure of working on the first model of Touch & Sew made by Singer.  It is a model 600 but the model number is not displayed in the usual place, it just says "Auto-Reel" and the wind-in-place bobbin is placed in wind mode using a push-down button.


  Later versions of the 600 and its descendants had the winding mechanism actuating button under the slide plate.

  When I saw the machine, I assumed there would be little to do other than oil and grease because it looks as though it has been used very little.  No paint chips, scratches, needle strikes, or other signs of wear.  It was noisy running, indicating that some time had passed since its last lubrication, so that's where I started.  After oiling and greasing, I tested the various functions and found that (a) the release mechanism was not latching and


 (b) the needle would not return to the right in zig zag.

  The zig zag problem was easy to figure out, there was a broken spring lying in the bottom of the housing.


 I couldn't find a new replacement and none of my parts machines used the identical spring, even though the part number for the spring in the 500 is the same.  I found a similar spring in my parts bin that was longer and cut it down to the same length as the old spring.

  After replacing the spring, the release mechanism would still not latch and clattered back and forth with every rotation of the shaft.  The service manual tells how to adjust that mechanism but says, "Be sure stitch pattern selectors are properly engaged.  Otherwise, machine will not engage when in operation." I looked at the pattern selectors, and, sure enough, the lower selector was not popping out when moved to position "A".


  I started tracing out the mechanism to find the reason and saw that the rear index pin was full of crud


and I assumed that the lever would not lock into the slot because of that. 

  After removing the index pin, cleaning, reinstalling and readjusting, there was no improvement.    The cam followers were at the correct position but the indicator on the front of the machine was not.  When the cam followers were in the straight stitch position, the indicator read "C" instead of "A".  Back to the service manual and adjusting the indicator.  Once the indicator and the cam followers agreed, the selector button popped out as it should and everything worked fine, sort of.


  On to testing the stitches and I noticed there was less than 1/4" clearance under the presser foot.  Normally that is an easy adjustment, but on this series of machines, the presser foot pressure adjuster


must be removed to access the presser bar clamping screw. 


  Removing is not a problem, reinstalling is a bit troublesome.

  With all those adjustments and repairs, straight stitch worked properly but zig zag would only catch on one side.  That normally means that either the presser bar height is incorrect or the hook is not timed to the needle.  In this case, it was the hook timing.  When the hook point was supposed to be even with the needle, it was about 10 degrees off.


  After spending much of my Labor Day weekend tinkering with this machine, today I finally put it all back together, wiped off the greasy fingerprints and sewed a successful test swatch.  I hope the next one is a bit easier, although I enjoyed the challenge and learned a lot from this one.

Ed
Ed's Vintage Sewing Machine Parts Store

Friday, September 04, 2015

Singer 6267


Yesterday, a friend gifted (cursed?) me with a Singer 6267.  She said it had been in storage for some time and then left in a hot car for a day and the next time she ran it, it was stiff and ran slow.  She replaced the machine and now, if I didn't want it, she would donate it.  It came with a goodly assortment of accessories and one of the two manuals.


Being a sucker for a free sewing machine, I took it home.  I cleaned lint out of the gear teeth in the lower section and oiled all the spots I could get to but cannot figure out how to remove the top lid.  If anyone knows the secret to that, please clue me in.  I was able to download the second manual from Singer so I could figure out how to wind a bobbin and remove the bobbin case for cleaning.

Anyway, it sews fine, all the stitches I tried worked fins and it sews with all the speed I would expect, albeit a bit noisy.


  The only thing I can find wrong is the slot to the right of the upper tension adjustment, where the thread is supposed to lie, is too tight for thread to comfortably fit in the slot, it has to be forced.  I need to find where to open up that slot.


I sewed a couple of quilt blocks for a pillow and everything worked as advertised.


The jury;s still out on whether I will keep this machine or not, it's newer and more complicated than the rest in my stable and it has the type of slide plate that folds back the seam allowances as you sew.  I can get used to lifting the fabric as a seam allowance slides across the bobbin cover but don't feel that I should need to do that, I have plenty of machines that don't require me to trick them into sewing well.  I do like the LOW BOBBIN warning light, too many times I have sewn seams with no thread in the bobbin.


Ed

Monday, July 27, 2015

Loops or Knots on the Underside of the Fabric

Another in the series of troubleshooting tips.  Tips are not in order of most common to least common and do not need to be performed in sequence.  Pick the easiest ones first and work to the more difficult ones.  Not all tips will apply to all machines.

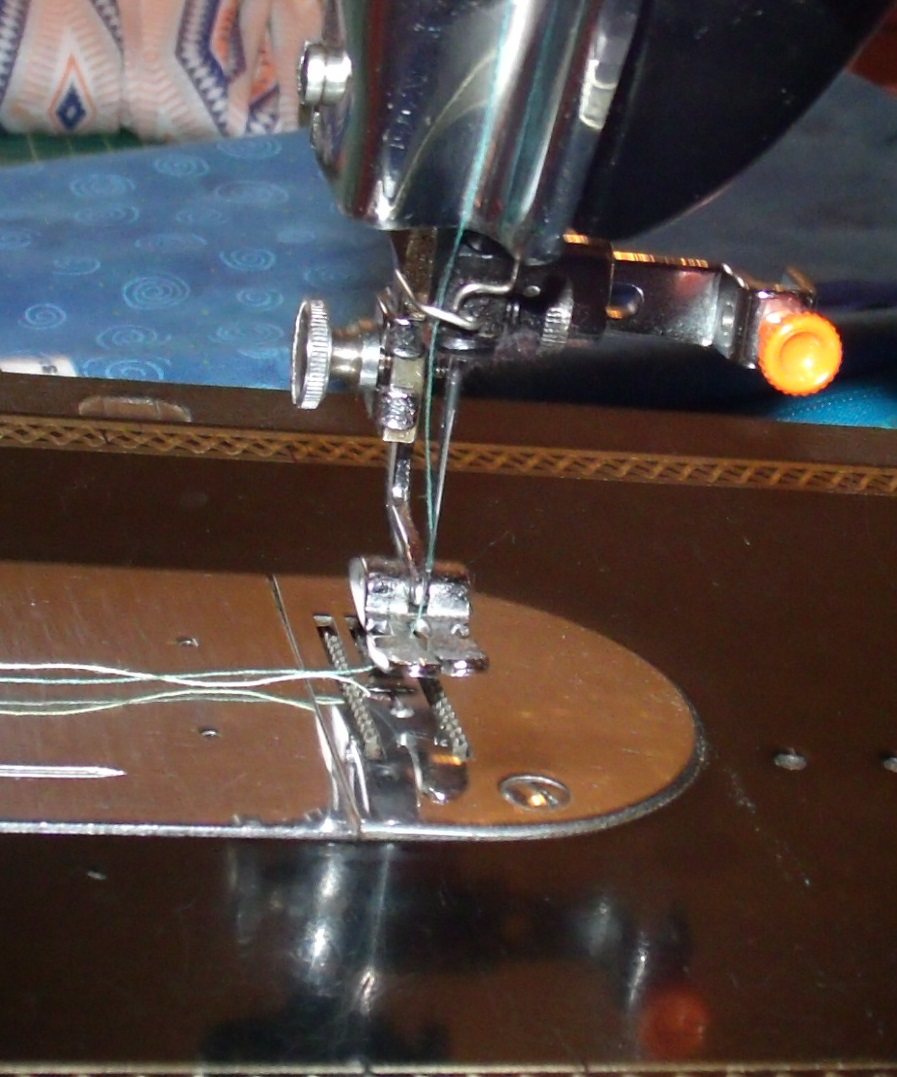
The lower thread lies straight on the underside of fabric and the upper thread appears there in form of loops or small knots.

1. Cause: The tension of the upper thread is too weak or the tension of the lower thread is too tight.
 Solution: Tighten the tension of the upper thread, or loosen the tension of the lower thread, until the tensions of both threads are correctly balanced.

2. Cause: There are dirt, lint or pieces of thread between the Tension Discs.
 Solution: Take apart the upper tension, clean the Tension Discs thoroughly, then replace the upper tension and adjust it correctly.

3. Cause: The upper thread has cut deep grooves into the Tension Discs.
 Solution: Replace the defective Tension Discs with new ones.

4. Cause: The Bobbin Case is not threaded correctly. The Bobbin unwinds itself in the wrong direction.
 Solution: Thread the Bobbin Case correctly.

5. Cause: The head of the Tension Adjusting Screw of the Bobbin Case protrudes too much and catches and retards the upper thread.
 Solution: Adjust this screw correctly. If this condition continues to persist, smoothen the head of this screw with fine emery cloth or replace the defective screw with a new one.

6. Cause: The stitch hole in the Throat Plate or Feed Dog is too small.
 Solution: Replace the Throat Plate or Feed Dog with one that has a larger stitch hole.

7. Cause: The point of the Needle is bent over ("hooked point").
 Solution: Replace the defective Needle with a new one.

8. Cause: The Bobbin is not evenly wound. It unwinds itself irregularly.
 Solution: Replace the Bobbin with one that is wound evenly.

9. Cause: The Bobbin is damaged or bent and does not revolve freely and evenly.
 Solution: Replace the defective Bobbin with a new one.

10. Cause: Lint or dirt in the Bobbin Case prevents the Bobbin from revolving freely.
 Solution: Remove all dirt from this part. Clean and dry thoroughly before replacing in the machine.

11. Cause: The needle is not correctly timed in relation to the Loop Taker (Hook).
 Solution: Make certain that the Needle is pushed all the way up into the Needle Bar and held there firmly. Adjust the point of the Loop Taker in relation to the Needle. For "Timing" follow this general rule: The Needle must have risen about 3/32 of an inch from its lowest position at the moment the point of the Loop Taker is just at the center of the rising Needle. At this moment the point of the Loop Taker must be about 1/16 of an inch above the eye of the Needle.

12. Cause: There is insufficient clearance between the Bobbin Case Holder and the Bobbin Case Holder Position Bracket in horizontal axis Rotary Hook Machines. On vertical axis rotating hook types may be insufficient clearance between tab extending from Bobbin Case to the left and the notch at the underside of the Throat Plate.
 Solution: Turn the machine by hand and observe where the upper thread gets caught.
Increase the clearance, where required, by carefully removing material from the component parts of the machine (by means of fine emery cloth). Smoothen the repaired portions with crocus cloth. The heaviest thread to be used must pass freely between these parts.

13. Cause: The mechanism for releasing the upper thread tension is incorrectly adjusted. It releases the tension of the upper thread too early.
 Solution: Adjust this mechanism so that the tension of the upper thread is released only during the last moment of the upward motion of the Presser Bar Lifter.

14. Cause: The upper thread gets caught somewhere below the Throat Plate.
 Solution: Examine Hook and Bobbin Case with regard to rough spots which may catch the upper thread and retard it, thus causing the loops on the underside of the fabric. Eliminate all rough spots with the aid of an oilstone or with fine emery cloth, and then polish these portions with crocus cloth or on a buffing wheel.

15. Cause: The Thread Take-up Spring (Check Spring) is not adjusted and does not work properly.
 Solution: Adjust the Thread Take-up Spring until it has the correct tension and its upward motion is just finished at the moment the Needle enters the fabric.

Ed
Ed's Vintage Sewing Machine Shop


Tuesday, July 21, 2015

Ankers Aweigh!

Ankers Aweigh!

In my effort to downsize, I have been culling through my stock of sewing machines with an eye to disposing any that don't please me.  I put this Anker RZ on the shelf years ago for some reason I couldn't remember and decided to break it out and make a final decision.


The machine had not been used in several years but I fired it up and sewed a test swatch.  It sewed beautifully!  I oiled it and sewed a larger project and find it to be one of the nicest machines I have ever used.  It is smooth, quiet, and strong and sews everything I have put under the presser foot without complaining.

I received my new camera today and am now able to get some good photos and don't have to rely on old cell phones for pictures to post.

It's hard to read the badge but it says "ANKER WORKS BIELEFELD GERMANY".


  Like all German sewing machines, it appears to be well-engineered and was probably an expensive machine in its day.


I particularly like the bobbin winder, it is designed like the old Singer winders with a finger that moves back and forth across the bobbin to ensure a smooth, even winding.


I haven't figured out what the pad is below the balance wheel, it is stationary and the only purpose I can imagine it could serve is as a pincushion.


That would keep owners from pinning a piece of fabric to the arm and scratching the paint with pins.

I think this one is a keeper, makes me want to dig out the Haid & Neu and give it a spin!

Ed