Tuesday, January 19, 2016

Singer 500a Will Not Form Zig Zag Stitch


To keep all my old sewing machines limber, I like to take them off the shelf occasionally and use them on a project.  I really should tag each machine to tell me when was the last time it was oiled and used but I’m just too lazy.  Anyway, I pulled this Rocketeer off the shelf, oiled it and tested the stitches.  I have no idea how long it had been sitting unused, maybe years.

Straight stitch was fine


but wide zig zag was not. 


I narrowed the stitch width and it got a wee bit better, but still not in the acceptable range.


My first thought was that the needle bar had been shoved up in its clamp by hitting a button or zipper but the marks on the needle bar were in the correct position so I knew that was not the cause.


The next thought was hook timing.  The point of the hook should pass just above the eye of the needle when the lower timing mark on the needle bar is at the needlebar bushing.  It was, so that was not the issue.


When I was watching the hook pass by the needle, I noticed that there seemed to be a more-than-usual separation between the needle and the hook point.  The service manual says that distance should be .018 inches but I measured it at .032 inches – almost twice what it should be.


To be sure that the needlebar was not bent, I installed a size 18 needle and a straight stitch needleplate and checked where the needle passed through the hole in the needleplate.  It looked just like the drawing in the service manual, so the needlebar was not bent.

The next step was to move the hook closer to the needle.  The service manual says to loosen the two setscrews indicated by "O"

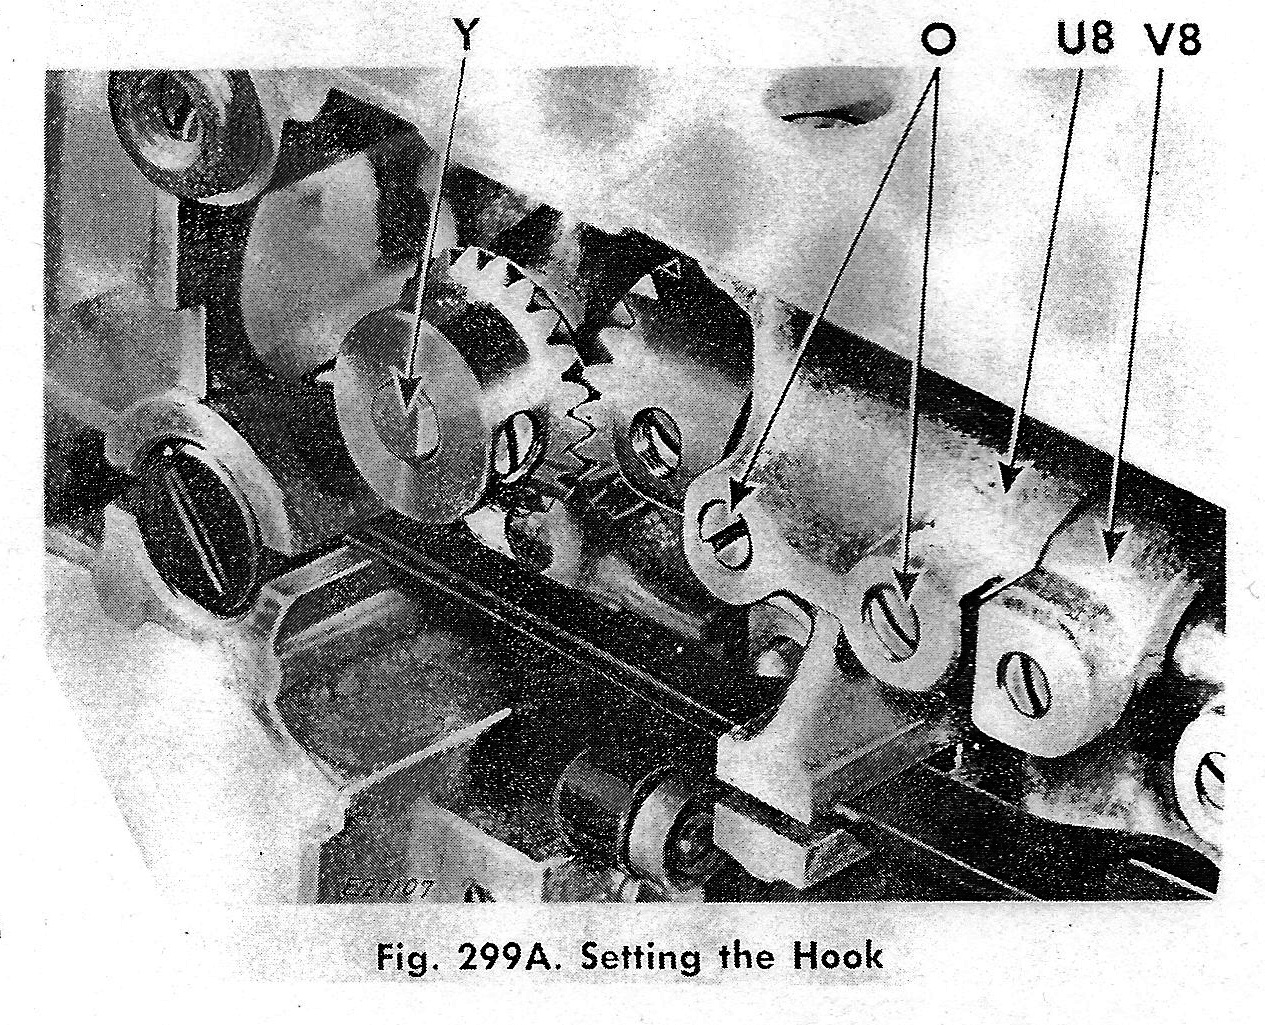
And move the entire hook saddle.  It was easy enough, after loosening the two screws, the hook saddle swivels around the shaft it is mounted on and the hook point can be moved closer to or farther from the needle.  I moved the hook as close to the needle as possible without hitting it and tightened the screws.

I now still have good straight stitch and the narrow zig zag is as it should be.


I am not getting the full width zig zag that the machine is capable of, but that is a different problem that I will tackle later.

 Ed


Saturday, January 09, 2016

Re-Wiring a Vintage Sewing Machine Foot Control


You bought a new foot control and want to connect it to your current cord; you bought a new cord and need to connect it to your current foot control; you bought a new cord and foot control and they came to you as separate pieces.  The following should help you get that sewing machine running.
I used a vintage Necchi foot control in my example, but you should be able to decode your foot control, once you get it opened up.

Not all vintage foot controls look the same, but all 2-wire controls operate essentially the same – electrical current flows into the control; a resistance of some sort (carbon pile, resistance wire, etc) reduces the size of that current and sends it out to the motor.

1.  Disconnect all electrical power before starting to avoid the possibility of shock or fire!!!
2. Tip the foot control over and locate the screws holding on the bottom cover. 


Many vintage Asian-made foot controls have covers that just slide off, rather than being screwed on.  I won’t discuss modern controllers because there are YouTube videos covering them.  Remove the screws or slide off the bottom cover.  Now is the time to look at any cushions surrounding the screws and obtain replacements for missing or deteriorated cushions.
3. If there is an insulation plate, remove it and set aside.  Not all foot controls have them.


WARNING:  Some controllers contain a capacitor to filter out radio noise.  They usually look like small tin cans.  Capacitors can store electricity, so do not touch the connection points to avoid shock.

4. At this point, look around for pieces that might fall out and get lost.  This controller has a spring that is not attached in any way, some button controllers have an actuating button that can fall out.  Remove any loose pieces, noting where they go so you can get them back in the right position.


5. You are now ready to disconnect the old cord, if there is one.  Just unscrew the two screws and lift the wires off.


Preparing the New Cord

6. If the cord you are installing has terminals installed, skip to step 12.
7. Since you’re still here, your cord does not have terminals installed.


  Terminals are available at Radio Shack and many hardware and home stores.  I got mine at Harbor Freight and Lowe’s.  Terminal sizes are denoted by the color of the insulation sleeve.  For the size wire used by sewing machines, pink or red insulation sleeve is appropriate.
8. Strip about ½” of insulation from the wire ends.


9. Insert the end of the wire into the terminal so that the wire insulation is well inside the terminal’s insulation sleeve and the stripped end of the wire peeks out beyond the end of the insulation sleeve.


10. You can crimp the terminal with ordinary pliers, but a better result will be achieved with wire crimping pliers, like these with the yellow handle.


11. Crimp the terminal close to the end of the insulation sleeve that covers the stripped wire end.  You want the terminal to connect to the stripped wire, not the insulation.


Installing the Cord

12. Installation is the reverse of removal.  If you have space inside the controller, tie a knot in the wires to prevent them from sliding out through the exit hole.  Connect the two wires to the two terminals.  It makes no difference which wire goes to each terminal, a resistor can’t tell the difference which way current is flowing.


13. Route the wires so that they do not interfere with any moving parts and out through the exit hole, slot, or whatever is there.
14. Replace any loose parts you removed in step 4.
15. Replace the insulating pad, if your controller has one.
16. Replace the bottom cover.
17. Connect to your sewing machine and Sew!

Ed


Wednesday, January 06, 2016

Berninas

We had to go to LaPlata, Maryland yesterday and our appointment was just around the corner from Material Girls Quilt Shop, so Kathie insisted we stop by for a "quick look".  It has been a while since I have visited that store, so while Kathie was petting fabric, I wandered around looking for sewing machines.  The shop has expanded since I was last there and they have taken over a second storefront completely dedicated to Bernina sewing machines.  Now, I do not sew enough to justify the price of a Bernina, but it's still fun to see them.  As I walked into the showroom area, I immediately spotted a vintage machine in the front corner.


It was the first Bernina 117 I have ever seen in person, and this one is in pristine condition!  I have seen them on eBay and always thought they looked cool, but at the time, an average specimen was selling for $400-$600, so I passed.  I must have stood there ten minutes, just looking at the paint, decals, and chrome plate.

As I turned around to go back into the fabric section, I spotted a lineup of Berninas on a high shelf


It's like a graphic timeline of Berninas from the 1950s to 1980s(?)  The place is like a mini-museum of Berninas and made me not mind stopping for a short time.

Ed
Ed's Vintage Sewing Machine Store