Showing posts with label Cleaning. Show all posts

Tuesday, October 20, 2015

Kenmore 385.1684180

Even though it has the slide plate that turns under the seam allowance, I really like my 385.17881 Kenmore because it is so smooth and quiet. 


I always consider those traits to be an indicator of the quality of the machine.  Unfortunately, when I got it, the stitch length dial was very difficult to turn and I tried to loosen things up with a heat gun, melting some teeth on the plastic gear behind the stitch length dial.  I was able to reposition the gear so that the missing teeth were  not where they would affect stitch length selection, but the dial still turns very hard and I only have stitch lengths of 10-12.  I have been looking for a replacement for that machine, hoping to find the exact model needing work so I could cannibalize parts from my current machine to rehab the new one.

I still haven't found the exact model replacement, but I saw this 385.1684180 on an online auction.


 The style lines are very similar to the 385.17881 and it has the same rotating hook and drop-in bobbin, so I bid on it, hoping it would be as smooth and quiet as the 385.17881.

When I received the 385.1684180, I saw that it appears to have been well-used, but not abused.  The light bulb was burned out and the plastic bushings that hold in both spool pins are broken.  Sears Parts Direct had the bushings in stock and they are on the way to me.  The bobbin area was very clean, making me think the machine had been well cared for, but when I opened the bottom covers, a lint ball the size of a plum fell out!  It had been cleaned from above, but never went in for a professional servicing.  There was also a lot of gummy substance on many of the surfaces underneath, including the hook gear.  I tried to clean it off with mineral oil, alcohol, and several other substances but scraping it off seemed to be the only way to remove it.

Those issues  were easy to fix but one was more difficult - it would not stitch in reverse.  Pressing the reverse button had no effect, it just kept going forward.  Tracing out the linkage from the Reverse button, I found that there are two springs and a collar that slides along the hook shaft. 


When the collar is to the right, the machine sews forward.  When the collar slides to the left, the feed dog travel is altered so the fabric feeds in reverse. 

Here's how it works:
    The spring near the Reverse button (not shown in these photos) is stronger than the spring down by the collar (in yellow circle).
    When the Reverse button is pressed, the weaker spring is allowed to slide the collar (in the red circle) to the left for Reverse.
    When the Reverse button is released, the stronger spring pulls the rod (in blue) and overrides the weaker spring and slides the collar to the right for forward sewing.

  I could feel that the collar was not moving freely and spent two days trying to free it up.  After lubing and exercising the collar and hook shaft for hours with no results, I accidentally knocked the arm from the weaker spring out of its track and found that the collar itself was actually free-moving, it was the arm from the weaker spring to the collar that was binding.  I had oiled the pivot point of that arm in the very beginning but that was not enough.  I removed the arm and spring, cleaned everything well and re-lubricated.  The Reverse button now works as advertised and the machine sews backward as well as forward.

 FORWARD

REVERSE
 
 
Ed


Monday, July 27, 2015

Loops or Knots on the Underside of the Fabric

Another in the series of troubleshooting tips.  Tips are not in order of most common to least common and do not need to be performed in sequence.  Pick the easiest ones first and work to the more difficult ones.  Not all tips will apply to all machines.

The lower thread lies straight on the underside of fabric and the upper thread appears there in form of loops or small knots.

1. Cause: The tension of the upper thread is too weak or the tension of the lower thread is too tight.
 Solution: Tighten the tension of the upper thread, or loosen the tension of the lower thread, until the tensions of both threads are correctly balanced.

2. Cause: There are dirt, lint or pieces of thread between the Tension Discs.
 Solution: Take apart the upper tension, clean the Tension Discs thoroughly, then replace the upper tension and adjust it correctly.

3. Cause: The upper thread has cut deep grooves into the Tension Discs.
 Solution: Replace the defective Tension Discs with new ones.

4. Cause: The Bobbin Case is not threaded correctly. The Bobbin unwinds itself in the wrong direction.
 Solution: Thread the Bobbin Case correctly.

5. Cause: The head of the Tension Adjusting Screw of the Bobbin Case protrudes too much and catches and retards the upper thread.
 Solution: Adjust this screw correctly. If this condition continues to persist, smoothen the head of this screw with fine emery cloth or replace the defective screw with a new one.

6. Cause: The stitch hole in the Throat Plate or Feed Dog is too small.
 Solution: Replace the Throat Plate or Feed Dog with one that has a larger stitch hole.

7. Cause: The point of the Needle is bent over ("hooked point").
 Solution: Replace the defective Needle with a new one.

8. Cause: The Bobbin is not evenly wound. It unwinds itself irregularly.
 Solution: Replace the Bobbin with one that is wound evenly.

9. Cause: The Bobbin is damaged or bent and does not revolve freely and evenly.
 Solution: Replace the defective Bobbin with a new one.

10. Cause: Lint or dirt in the Bobbin Case prevents the Bobbin from revolving freely.
 Solution: Remove all dirt from this part. Clean and dry thoroughly before replacing in the machine.

11. Cause: The needle is not correctly timed in relation to the Loop Taker (Hook).
 Solution: Make certain that the Needle is pushed all the way up into the Needle Bar and held there firmly. Adjust the point of the Loop Taker in relation to the Needle. For "Timing" follow this general rule: The Needle must have risen about 3/32 of an inch from its lowest position at the moment the point of the Loop Taker is just at the center of the rising Needle. At this moment the point of the Loop Taker must be about 1/16 of an inch above the eye of the Needle.

12. Cause: There is insufficient clearance between the Bobbin Case Holder and the Bobbin Case Holder Position Bracket in horizontal axis Rotary Hook Machines. On vertical axis rotating hook types may be insufficient clearance between tab extending from Bobbin Case to the left and the notch at the underside of the Throat Plate.
 Solution: Turn the machine by hand and observe where the upper thread gets caught.
Increase the clearance, where required, by carefully removing material from the component parts of the machine (by means of fine emery cloth). Smoothen the repaired portions with crocus cloth. The heaviest thread to be used must pass freely between these parts.

13. Cause: The mechanism for releasing the upper thread tension is incorrectly adjusted. It releases the tension of the upper thread too early.
 Solution: Adjust this mechanism so that the tension of the upper thread is released only during the last moment of the upward motion of the Presser Bar Lifter.

14. Cause: The upper thread gets caught somewhere below the Throat Plate.
 Solution: Examine Hook and Bobbin Case with regard to rough spots which may catch the upper thread and retard it, thus causing the loops on the underside of the fabric. Eliminate all rough spots with the aid of an oilstone or with fine emery cloth, and then polish these portions with crocus cloth or on a buffing wheel.

15. Cause: The Thread Take-up Spring (Check Spring) is not adjusted and does not work properly.
 Solution: Adjust the Thread Take-up Spring until it has the correct tension and its upward motion is just finished at the moment the Needle enters the fabric.

Ed
Ed's Vintage Sewing Machine Shop


Thursday, April 09, 2015

My Machine Turns Heavily or Jams

Another in the series of troubleshooting tips.  Tips are not in order of most common to least common and do not need to be performed in sequence.  Pick the easiest ones first and work to the more difficult ones. 

1a. Cause: Sewing thread has wedged itself between the balance wheel and the arm of the machine.
 Solution: Take off the balance wheel and remove the thread.
1b. Cause: Thread has wrapped itself around the hook shaft.
 Solution: remove the thread from the hook.
1c. Cause: Thread has wrapped itself around the pivot point of the take-up lever.
 Solution: Remove the thread from the take-up lever and oil the point because the thread has soaked up all the existing oil.
1d. Cause: Thread has become wedged between the bobbin case and the bobbin case base.
 Solution: If the thread cannot be easily removed, disassemble the hook and remove the thread.
2. Cause: There is too much pressure on the fabric.
 Solution: Reduce the pressure of the presser foot.
3. Cause: The feed dog rubs against the sides of the slots in the throat plate.
 Solution: Loosen somewhat the screws that hold the feed dog to the feed bar, then adjust the feed dog so that it can move freely in the slots of the throat plate.  Tighten the feed dog screws firmly after this adjustment.  If throat plate slots are badly damaged, replace the throat plate.
4. Cause: Due to accumulation of dirt and gummed oil between the throat plate and the feed dog, the feed dog presses against the underside of the throat plate.
 Solution: Remove throat plate and clean it.  Also clean the parts of the machine to which these parts are attached.
5. Cause: The belt running to the balance wheel is too tight.
 Solution: Adjust or replace the belt.  The belt should have just enough tension so as not to slip.
6. Cause: Dirt, thread, and pieces of broken needles have wedged between the bobbin case holder and the hook.
 Solution: Disassemble these parts, clean them thoroughly, and replace them on the machine.
7. Cause: The bearings of the machine are tight due to rust or the use of improper oil.  The oil may be gummed in the bearings; there may also be dirt in the bearings.
 Solution: Squirt the recommended solvent into all bearings and run the machine for a while.  Oil the machine afterwards with good sewing machine oil.  Do not use thick oil or vegetable oils.
8. Cause: One or several parts inside the machine are tight.  This may be due to improper assembly, lack of oil, or bent parts.
 Solution: Disassemble the machine systematically, always trying whether it turns freely or not.  Stop disassembling once you can turn it freely.  Examine all removed parts and repair or replace them as necessary.  Clean all parts thoroughly in a recommended solvent.  Assemble the machine carefully, making sure it turns freely every time a part has been inserted.  Oil the machine properly after it has been reassembled.
9. Cause: The thread take-up lever is bent.
 Solution: Remove the thread take-up lever and straighten it, if possible.  Replace the lever if it is badly defective.
10. Cause: The throat plate is bent downward due to repeated dropping of the presser foot.  As a result, the feed dog rubs against the underside of the throat plate.
 Solution: Place the old throat plate. Top surface down, on a flat surface and straighten it by tapping it carefully with a hammer.  If badly distorted, replace the throat plate with a new one.
11. Cause: The needle bar is bent.
 Solution: Remove the needle bar and turn the balance wheel by hand.  If the machine turns easily now, it indicates that the needle bar is bent.  Straighten the bent needle bar on a flat surface, if possible.  If the old needle bar is defective beyond repair, replace with a new needle bar.
12. Cause: The tail of the main shaft is bent.  This can happen if the machine was dropped or the balance wheel was bumped.
 Solution:  Watch the balance wheel as it rotates.  If it wobbles, that is an indication that the main shaft tail might be bent.  Remove the balance wheel and rotate the main shaft so that the bent tail is pointing up.  Place a block of wood on the shaft tail and hit the wood block with a hammer, just hard enough to bend the shaft back to the proper position. Do not hit the shaft directly with the hammer, that will damage the soft metal of the shaft and prevent the balance wheel from fitting on the shaft.

Ed
Ed's Vintage Sewing Machine Shop

Friday, May 23, 2014

Kenmore 1720

  Last week, a lady called having a problem with her Kenmore Ultra Stitch 12.  When I went to pick it up, she had a second machine belonging to a friend, a Kenmore 1720.


  She said there was nothing wrong with it, it just needed cleaning and oiling.  The machine looks very well cared for and little used but it had a very loud clanking sound when operated.  Except for that noise, the machine ran smoothly and, with the bobbin case /shuttle removed, very quietly so I was pretty certain where the noise was originating from.  I opened up all the panels and oiled everything and, while doing that, found some thread wrapped around the knuckle of the thread take-up lever.

 
  Here's where it gets goofy - AFTER I removed the thread, the machine locked up so tight that the motor wouldn't turn it over and it was difficult to rotate by hand!  I looked for additional thread clogs and re-oiled evrything with no improvement. To isolate, I disconnected the connecting rod that transmits movement from the main shaft to the lower section.


  This cuts the mechanism in half and tells me whether the problem is in the upper or lower section.  It was in the upper section.  Having exhausted all my ideas, I doused the whole upper section with Liquid Wrench and let it sit overnight.  This morning, it seemed a bit looser turning by hand and, after a few revolutions, the motor took over and spun the shaft. I ran in the machine at top speed for about a minute and all the binding is gone.  I have no idea where the problem was.

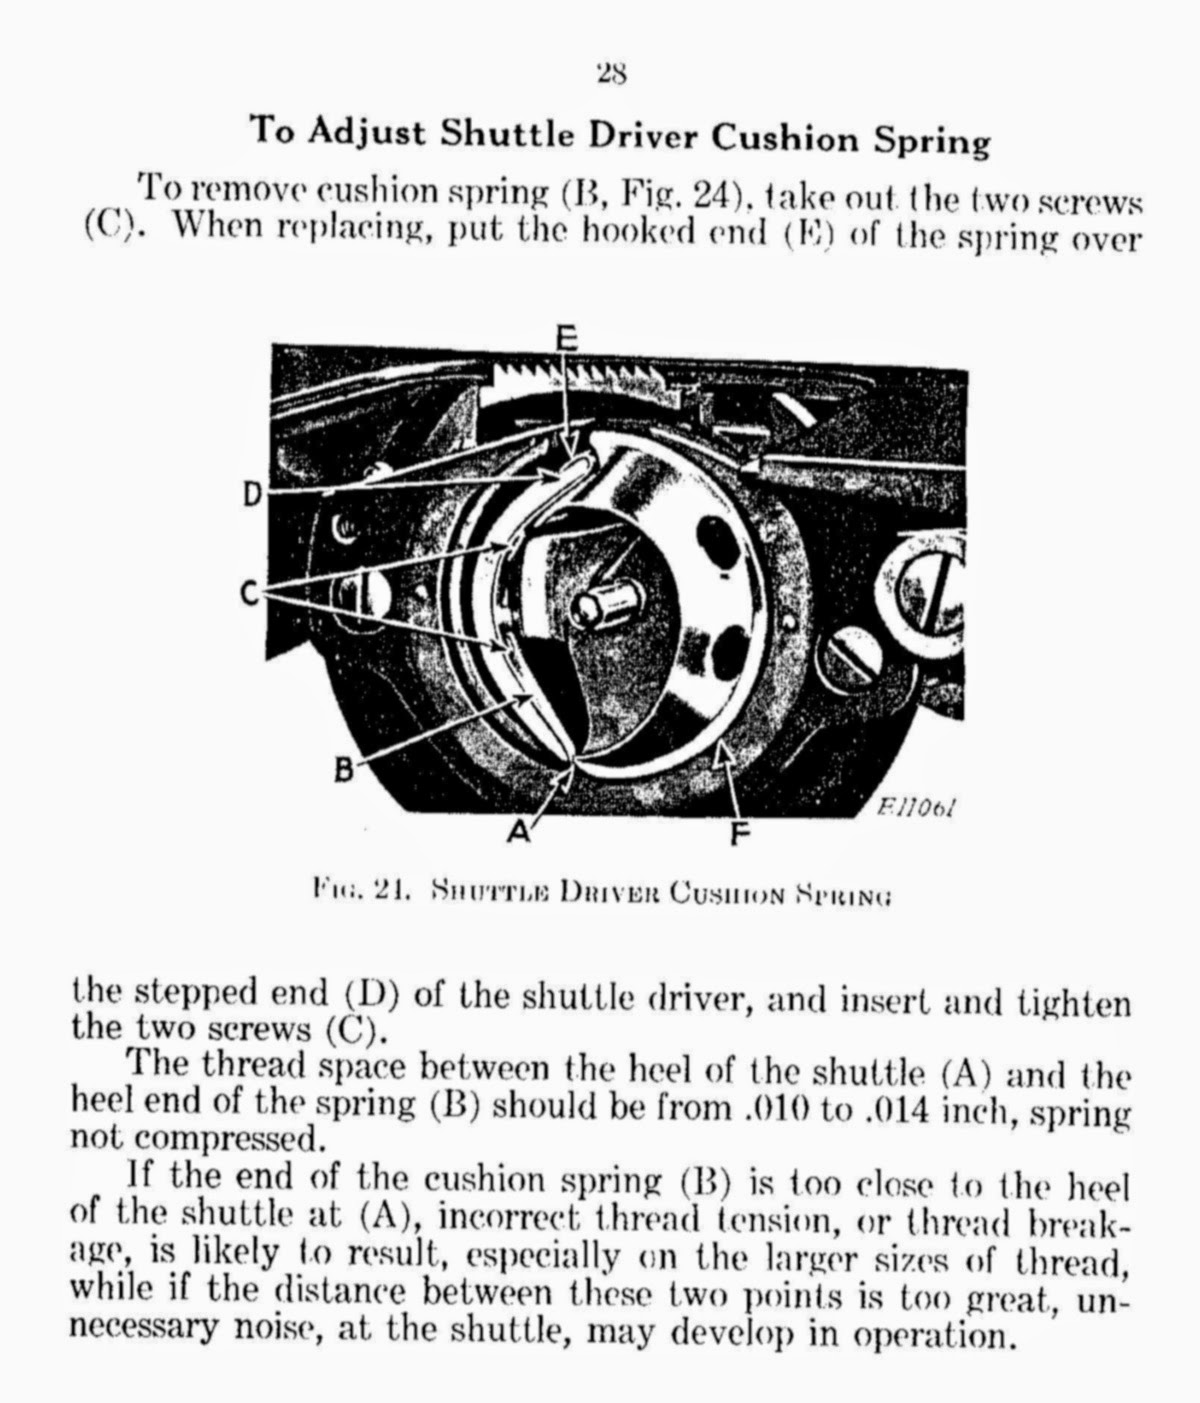
Then on to the noise in the shuttle area.  The thread gap between the tip of the shuttle cushion spring and the shuttle should be just over the thickness of thread but this one was a good 1/8 inch.

  That explains the noise!  I went to bend the cushion spring to narrow the gap and found that there was no end - the end of the spring had broken off.


I rummaged through all my parts bins and could not find a single cushion spring. Apparently, that is something that needs replacing so seldom that I haven't kept any spares.  Then I remembered the Julia I am parting out still has the cushion spring so I cannibalized it but it is too long to work in the Kenmore.  Fortunately, my parts source has the springs and attaching screws in stock, so I can order replacements.

Ed
Ed's Vintage Sewing Machine Shop

Monday, February 24, 2014

Elna Supermatic

  Trolling through the only thrift shop in this one-horse town, I saw a metal case which I almost passed up until I saw the open latch.


  Elnas are not common in this area, but I have seen a few and knew that carrying case did not hold a manual typewriter, as I had first thought.  Inside was a vintage Elna Supermatic.


  It is dirty but came with a zip-lock bag full of goodies:  Several instruction manuals and advertising pamphlets


  A baggie of presser feet and other accessories


  The knee bar which is necessary because it is the only means of powering the machine, there is no foot control.


  And a few cams


  At $2 apiece, the cams alone are worth more than I paid for the machine!

  The machine runs, although slowly, and the only problem I see initially is that the presser bar is frozen and the presser foot will not raise. A little penetrating oil should fix that.  Now to go clean it up and play a little.

LATER THAT SAME DAY:

  Apparently more was frozen than the presser bar (which is now functional) because there was literally a pool of brown oil in the bottom of the freearm. Some of it leaked out when I had the head tipped over to remove the bottom plate, but there was still lots left.  


I have oiled many machines in my time but this was the first time I had to DE-OIL one!

It's all cleaned up and sewing, ready for fine-tuning. 


 It growls and rattles a bit, probably just need to find the right spot to lubricate.  Also, it runs fast with no fabric under the foot but slows to a crawl when sewing.  Sounds like something is slipping in the drive train.


Tuesday, February 18, 2014

Removing a Supernova Balance Wheel

The first time I had to remove the balance wheel from a Necchi Supernova, I was a bit confused.  I removed the nut but there was no torque washer underneath and the balance wheel would not come off the shaft tail.  When I finally learned, I took photos and now Frank is having the same issue so I decided to post those photos to help Frank and anyone else who hasn't figured this out yet.

STEP 1 - Loosen the two screws in the knurled nut and unscrew.


STEP 2 - The entire inner circle is the torque washer.


STEP 3 - Slide the washer off the shaft.


STEP 4 - Remove the belt and slide the balance wheel off the shaft tail.


Installation is the reverse of removal. If the balance wheel does not spin freely when winding a bobbin, try swapping the two screws in the knurled nut. One is longer than the other and that's how Necchi solved the problem of the torque washer being installed backward.

Ed

Ed's Vintage Sewing Machine Shop
Kathie's Online Quilt Shop

Sunday, December 08, 2013

The 66 is Finally Finished!

  I spent most of the day putting the finishing touches on this machine.  All I had left was the tension assembly and the bobbin winder and it would be ready for testing.  The bobbin winder went without a hitch. I love those old bobbin winders with the guide finger that precisely positions the thread winding on the bobbin so it comes out perfect. I'm sure that economics was the reason they were replaced with the lower quality contraptions on later machines because there are  many more parts and moving parts on the older winders.

  On to the tension assembly - when I separated the tension discs, there was a piece of thread lodged between them, possibly the cause of some previous tension problems.


  I cleaned and reassembled the tension assembly and installed it. It regulated tension all right, but did not release when the presser foot was raised. Do you see anything wrong with this tension assembly component?


  Neither did I the first time around but I knew there should be some piece with a bar passing between the sides of the split stud. The pin in the tension assembly needs something to push against to release the spring pressure from the outer disc.  The part should look like the one on the right here


  I threaded it and found that the upper thread would not pull up the bobbin thread.  The hook was a bit out of time from being disassembled for cleaning. After re-timing the hook, the machine seemed to be binding. I had adjusted the feed dog centering and tightened the screw back down too tight. with the machine running smoothly and sewing like it shoud, I noticed that one of the motor wires had a gap in its insulation so I had to replace the motor again and find a belt to fit. It seemed like it was one thing after another and took all day. We are in the middle of an ice storm, so I wasn't going anywhere anyway, but I could have found other tings to do with the time.

Here is the finished product. Not the best looking machine I have ever put out the door but considering the condition it arrived in, not too bad.


Saturday, November 30, 2013

Singer 66 Update

Progress is happening on the 66 I blogged about earlier.

Step 1 - I stripped it down to bare bones


Step 2 - Cleaned all the old brown scum off and polished any brightwork that couldn't be easily removed.  Notice the many rust spots on top, I'll get back to them later.


Step 2 - Cleaned up all the removed parts and reinstalled.  See the red felt in the hook area? That is there as an oil reservoir to supply lubrication to the hook. Many owners think it is a ball of lint and pull it out. Some day I will work up a tutorial on how to replace that felt.


Step 3 - I don't think I'll reinstall this motor, that wiring looks like an accident waiting to happen.


 I'm sure I have a comparable motor in my motor tub.


Step 4 - I applied rust converter to the rust spots.


This converter is advertised to turn rust into black primer. While flat black spots are not the most desirable, they are better than rust spots. I think the rust converter would have done an even better job except that I had wiped down the head with sewing machine oil before applying the converter. I wiped the paint down with degreasing wipe but that wouldn't get the oil soaked into the rust. If I had thought, I would have done it in the reverse order.


I still have to clean and reinstall the tension assembly, bobbin winder, and faceplate.  Then comes the job of testing and adjusting. I think it will be finished soon, glad I didn't have any other machines show up for servicing while I had this one in pieces.

Saturday, November 23, 2013

What Have I Done to Deserve THIS? Singer 66

A lady brought her Great-Grandmother's sewing machine into the shop for servicing this afternoon.  She said it had been stored in an unfinished basement for fifty years more or less.


 It had originally been in a treadle cabinet but was converted to electric somewhere along the line.  The Great-Granddaughter has the original treadle cabinet and wants to eventually de-convert the sewing head back to treadle configuration.  For now, she wants to use it as an electric machine until the wood cabinet is restored.

My first thought was that any machine stored in an unfinished basement for half a century would be too rusted to ever put back into sewing condition but Looking at the hook area, the rust appears to be light and I think it will buff off.


The electricals are shot


The stretch rubber belt is cracked in many places, the spring that holds the slide plate is missing


And the bobbin winder looks like a fused mess of corrosion and dirt.


On the bright side, I have parted out a number of 66's and have lots of spare parts in the parts bins. I think I can get this old lady sewing although it will never look new again.


Wednesday, October 16, 2013

I'm Afraid to Open This Featherweight

The covering is coming off the box, both latches are broken, it is held closed by an old belt and the owner warned not to pick it up using the handle.


Well, lifting the lid was a pleasant surprise - a nice assortment of accessories


 including a hemstitcher with all the associated parts.  You often find these missing the special needle plate.


  Now to look inside OH NO!!! IT'S MUMMIFIED!!!


  Turned out that was just a homemade cover to protect the machine below.  Not that there was much to protect, it has seen lots of use over the years.


The cords had been replaced and the power cord was a full twelve feet long. I wonder if they were plugging it in to the neighbor's wall socket. On further inspection, I see a bit of dirt but no rust, thank goodness.


Cleaning and some Oil and grease got the old gal to spin freely and some minor tension tickles and it sews like it's supposed to.


By the way, you always clean before you lubricate.  If you do it in reverse order, you clean out some of the new oil/grease with the lint.

Not a lot of mechanical work to be done, a new motor belt, new bed cushions and new cushions on the foot control were all the parts needed.

Tuesday, October 01, 2013

Janome Jem 639 and My New Favorite Cleaning Aid

  On my weekly stroll through the local thrift shop, I spotted a sweet little Janome Jem just waiting for me to take it home.  It appeared to be in good condition, the foot control, presser foot, and bobbin case were present so I picked it up in hopes that one of the local quilters would be willing to give me a little more than I paid for a lightweight machine to carry to sew-ins and classes.


  When I got it home, I found it was not just in good condition, it looks like it has never been used!  The sticker on top showing how to wind a bobbin was not even smudged.


  It needed no repairs or adjustments, it sews like right out of the box! The package of three needles that came with the machine is unopened.  The only attachment that came with it was a buttonhole foot, there probably should have been a zipper foot, at least.

  The one detracting feature was the price - written in magic marker on the plastic case.  In the past, I have used headlight lens restorer to remove magic marker from plastic but the headlight lens restorer was downstairs and I was upstairs, so I grabbed something else to try, a magic eraser.


  I had never used one of these but picked one up at the Dollar Store to clean our fiberglass shower stall.  It worked fine there, so I have been trying it out on other surfaces - tile grout, vinyl flooring, metal sewing machines - all with excellent results.  I was hesitant to use it on this shiny plastic machine, fearing it might leave scratches or leave a shadow of the Sharpie price mark.  It cleaned off the mark completely and left nary a scratch in the plastic.


 Now a word about Janome Customer Service. I emailed them asking for a copy of the 639 instruction manual.  Within 6 hours, I had a return email with a pdf attachment titled "639.pdf" but when I opened the file, it was for a 693, not a 639.  I emailed them again and within 6 hours had another return email with the proper instruction manual.  Thank you, Janome Customer Service.