Thursday, December 01, 2016

Dual Needle Industrial Machine


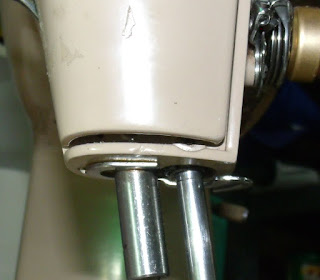
A few years ago, I was making lanyards to sell at craft shows that required a double stitch and I picked up this 1951 Singer 112W140 to cut my sewing time in half.  As it turned out, the double needles were not spaced correctly for my project, so I picked up an eBay lot of gauge sets (presser foot, throat plate, needle clamp, and feed dog) to fit onto my machine.  About that time, demand for my lanyards dried up and I no longer had a reason to change the spacing of the needles on my machine and never installed another gauge set.

Here’s my problem:  When my auction lot arrived, they were all just thrown in a box.  Most of the gauge sets and individual pieces are unidentifiable.  As far as I can tell, they are all for Singers and I think I have 20+ full or partial sets.  The two in the bottom right corner of the photo are still wrapped in oil paper and apparently have never been used, many of the others also appear unused and none look like they would not be usable.

Some of the pieces bear Simanco part numbers but many do not have any part number.  Some, but not all are tied together as sets, some are in boxes with Singer model numbers (212W140 & 112W115) written on the boxes but I do not trust those markings.  The rest are just individual pieces.  I spent hours today on the internet trying to find a way to identify all the sets and pieces and match them to the model of Singer they go to so I could list them in my Etsy shop or on eBay but had no luck.  If anyone could provide, or point me to a source for identifying these parts, I would appreciate it.  If anyone wants any of them, I will make you a GREAT deal.

Thursday, September 01, 2016

Singer 603E Needle Plate

GEDC0244.JPG

Yesterday, I broke out a really nice 603E that I haven’t used in a long time.  I oiled it up and was running it in and it was humming along perfectly - no rattles, squeaks, or clicks.  At full speed, I moved the stitch width lever over to check out the zig zag without thinking to check whether a zig zag needle plate was installed - it wasn’t!  Not only did the needle break, the straight stitch needle plate also broke.

GEDC0247.JPG

Thinking that the 603 uses the same needle plate as many other slant needle Singers, I grabbed one from another machine sitting nearby.

GEDC0220.JPG

When I started up the 603 again, there was a clicking sound that wasn’t there before.  My first thought was that a piece of the broken needle was somewhere down around the hook but close inspection dispelled that idea.  While looking for the needle fragment, I realized that the clicking sound was not present when the needle plate was removed.  Reinstalling the needle plate brought back the clicking sound.  That indicated to me that the feed dog was probably hitting the underside of the needle plate.  I could not feel any vibration on the plate, the feed dog was just kissing the underside of the plate.

My next thought was that the needle plate I had cannibalized from another machine might be slightly bent so I robbed one from another slant needle machine.  The clicking sound was still present.  My next thought was that perhaps the 600 series machines used a different needle plate than the 400 and 500 series machines, I rummaged through my partial sets of 600 series attachments to find a needle plate that was actually supplied with a 600 series machine. I found one in the box of attachments that came with this machine, probably the only attachment set that has not gotten separated from its machine.  Installing this newly-found needle plate, the clicking sound disappeared and the machine runs as smoothly as before my accident.

Now, here’s the reason I felt this was worth blogging about:  I have three different styles of needle plates for slant needle Singers, all with the same part number - 172200.  While the plates are identical on the top, there are marked differences on the undersides.

GEDC0249.JPG

The only plate that does not interfere with the feed dog is the one on the right.  I am not going to pull off the needle plates on all my slant needle Singers to see which ones have which plate but I will be on the lookout for this in the future.  On second thought, maybe I will pull all the needle plates so I can match up the needle plates with the correct machines but first, I need to figure out whether the plate on the left and the one in the center have any positive or negative effect and which machines perform best with either one.

Ed


Tuesday, August 16, 2016

Bernette MO-234 Serger


The other day, a friend gifted me with a Bernette MO-234 Serger.  She said it had just quit working and was making a "funny noise".  I don’t have enough experience with overlockers to agree to work on one for someone but she had already bought a replacement and just gave it to me to play with.

I put a few drops of oil here and there and threaded it up - it worked perfectly.  


Then, I made four Christmas stockings for this Fall’s craft show and there was never a hiccup sewing through four layers of fabric and two layers of batting.  The machine will probably take its place in my Rogue's Gallery of Unused Sergers, never to be used again.


At this point, there is really no reason to write a post about this machine but, here’s my first issue:

On the upper right corner of the machine is a tension assembly.  


That tension is not shown in any of the drawings of the machine in the manual and there is never any mention of it in the instructions. 


 I would say it is for winding bobbins, except overlockers do not use bobbins, so I see absolutely no purpose for that tension assembly.  Can anyone tell me why it’s there?

Second issue:  When I was opening up doors to check for lint deposits, a piece of translucent plastic fell out.  It is about two inches wide, three inches long, and 1/2 inch thick.


Again,  I find no mention of this part in the manual and cannot find a place it should fit.  How about some help there?  If this item was floating around inside the machine, that could be the source of the "funny noise"

Ed

Saturday, August 13, 2016

Unusual Singer Featherweight


A friend picked up a Singer Featherweight at an antique shop (first mistake).  The seller told her it had been recently serviced and was good to go.

The first thing I noticed when I flipped on the power switch was that the light did not come on.  There was no light bulb in the socket.

The presser foot installed was a gathering foot.  That is not what you want for straight stitching.  There was no straight stitch foot in the box of attachments.

The installed needle had a burr on the point.

The motor belt was too tight.

There was thread caught in the bobbin case base.

GEDC0228.JPG

There was a considerable amount of lint around the feed dog.

GEDC0226.JPG

The bed cushions are all completely squashed.

GEDC0229.JPG

The gears are in dire need of grease and the rest of the mechanicals need oil.

The good news is that it does sew.  It might need a slight hook-to-needle adjustment, but that is minor.

I have seen hundreds of Featherweights but this one was unusual in one respect - it had a generic motor installed.


I understand why someone would want to do that because replacement motors retail for well over $150 while generic motors can be bought for around $20.  The problem is that Featherweight motors have much different mounting provisions than all other sewing machines, making it impossible to attach a generic motor in place of the original motor.

The previous owner overcame this by designing an adapter plate.


  The motor attaches to the adapter plate and the adapter plate attaches to the Featherweight motor mount.  It is a very simple arrangement, just a flat piece of 1/8" steel plate with two holes to attach the new motor and an anchor nut at the FW motor mounting point

Unfortunately, the motor is mounted so high that the belt would hit the belt guard. 


 Instead of drilling a couple of holes to lower the motor and using a longer belt, the designer added an idler pulley to push the belt down to clear the guard.

I have searched the internet to see if this is a commercial product and have found nothing even similar.  I have a FW with a weak motor, maybe I'll design a similar adapter and install one of my spare motors.

Ed


Monday, June 27, 2016

Singer 403 and Fitbit Bracelet


I am always looking for small (quick) projects to exercise my vintage machines.  I have so many that they seldom get used and, like an automobile, letting one sitting idle is about the worst thing that you can do to either.

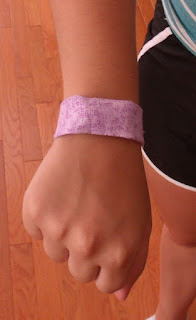
My daughter has a Fitbit that she wears religiously every day.  Problem is, the rubbery bracelets produce a rash on her wrist.  we have dozens of sewing machines and probably a ton of fabric in the house, so I volunteered to design a cotton holder for her Fitbit that would not cause a rash.


This is the design I came up with on the third attempt.


Begin with a strip of fabric 2 inches wide and 19 1/2 inches long.


Fold 1/4 inch of the right side of the fabric over twice


and tack down.


Mark the center of the fabric strip and fold the tacked end up to center.


Fold the other end up to center and overlap the tacked end by 1/2 inch.  Pin in place.


Sew up both sides with a scant 1/2 inch seam.


Clip the corners.


And turn right side out.


To keep the Fitbit from sliding all the way to the end, sew stitches 2 3/4 inches from both ends.


Attach hook-and-loop (one to the top of the bracelet and one to the under side.


Slide the Fitbit in through the opening.  push it all the way to the stitching and then work it back to center.


Initially, I was concerned that she would not be able to see the lights on the Fitbit and constructed the first prototype with a plastic window.  She didn't like the looks of the window and says she can see the lights through the thin cotton fabric so she told me to make future models without the plastic window.

The old Singer worked flawlessly throughout the process but I noticed that while left and center needle positions were correct,


 when right needle was selected, the needle only went slightly past center.


 I suspect lubrication is the issue but I oiled every piece I could get to in the circuit and was unable to correct the situation.  The odd part is that when sewing zig zag, the needle goes full throw left and right.  I notice that the left-Center-Right selector "pops out" when left or center positions are selected but does not "pop out" when right is selected.  That is where I will concentrate my efforts.


Tuesday, January 19, 2016

Singer 500a Will Not Form Zig Zag Stitch


To keep all my old sewing machines limber, I like to take them off the shelf occasionally and use them on a project.  I really should tag each machine to tell me when was the last time it was oiled and used but I’m just too lazy.  Anyway, I pulled this Rocketeer off the shelf, oiled it and tested the stitches.  I have no idea how long it had been sitting unused, maybe years.

Straight stitch was fine


but wide zig zag was not. 


I narrowed the stitch width and it got a wee bit better, but still not in the acceptable range.


My first thought was that the needle bar had been shoved up in its clamp by hitting a button or zipper but the marks on the needle bar were in the correct position so I knew that was not the cause.


The next thought was hook timing.  The point of the hook should pass just above the eye of the needle when the lower timing mark on the needle bar is at the needlebar bushing.  It was, so that was not the issue.


When I was watching the hook pass by the needle, I noticed that there seemed to be a more-than-usual separation between the needle and the hook point.  The service manual says that distance should be .018 inches but I measured it at .032 inches – almost twice what it should be.


To be sure that the needlebar was not bent, I installed a size 18 needle and a straight stitch needleplate and checked where the needle passed through the hole in the needleplate.  It looked just like the drawing in the service manual, so the needlebar was not bent.

The next step was to move the hook closer to the needle.  The service manual says to loosen the two setscrews indicated by "O"

And move the entire hook saddle.  It was easy enough, after loosening the two screws, the hook saddle swivels around the shaft it is mounted on and the hook point can be moved closer to or farther from the needle.  I moved the hook as close to the needle as possible without hitting it and tightened the screws.

I now still have good straight stitch and the narrow zig zag is as it should be.


I am not getting the full width zig zag that the machine is capable of, but that is a different problem that I will tackle later.

 Ed


Saturday, January 09, 2016

Re-Wiring a Vintage Sewing Machine Foot Control


You bought a new foot control and want to connect it to your current cord; you bought a new cord and need to connect it to your current foot control; you bought a new cord and foot control and they came to you as separate pieces.  The following should help you get that sewing machine running.
I used a vintage Necchi foot control in my example, but you should be able to decode your foot control, once you get it opened up.

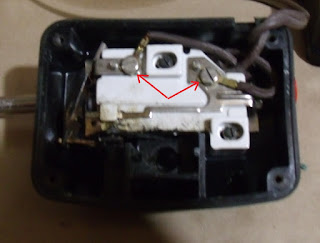
Not all vintage foot controls look the same, but all 2-wire controls operate essentially the same – electrical current flows into the control; a resistance of some sort (carbon pile, resistance wire, etc) reduces the size of that current and sends it out to the motor.

1.  Disconnect all electrical power before starting to avoid the possibility of shock or fire!!!
2. Tip the foot control over and locate the screws holding on the bottom cover. 


Many vintage Asian-made foot controls have covers that just slide off, rather than being screwed on.  I won’t discuss modern controllers because there are YouTube videos covering them.  Remove the screws or slide off the bottom cover.  Now is the time to look at any cushions surrounding the screws and obtain replacements for missing or deteriorated cushions.
3. If there is an insulation plate, remove it and set aside.  Not all foot controls have them.


WARNING:  Some controllers contain a capacitor to filter out radio noise.  They usually look like small tin cans.  Capacitors can store electricity, so do not touch the connection points to avoid shock.

4. At this point, look around for pieces that might fall out and get lost.  This controller has a spring that is not attached in any way, some button controllers have an actuating button that can fall out.  Remove any loose pieces, noting where they go so you can get them back in the right position.


5. You are now ready to disconnect the old cord, if there is one.  Just unscrew the two screws and lift the wires off.


Preparing the New Cord

6. If the cord you are installing has terminals installed, skip to step 12.
7. Since you’re still here, your cord does not have terminals installed.


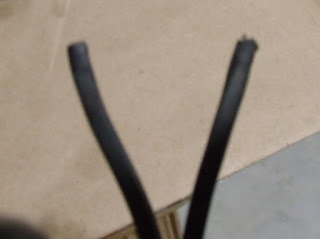
  Terminals are available at Radio Shack and many hardware and home stores.  I got mine at Harbor Freight and Lowe’s.  Terminal sizes are denoted by the color of the insulation sleeve.  For the size wire used by sewing machines, pink or red insulation sleeve is appropriate.
8. Strip about ½” of insulation from the wire ends.


9. Insert the end of the wire into the terminal so that the wire insulation is well inside the terminal’s insulation sleeve and the stripped end of the wire peeks out beyond the end of the insulation sleeve.


10. You can crimp the terminal with ordinary pliers, but a better result will be achieved with wire crimping pliers, like these with the yellow handle.


11. Crimp the terminal close to the end of the insulation sleeve that covers the stripped wire end.  You want the terminal to connect to the stripped wire, not the insulation.


Installing the Cord

12. Installation is the reverse of removal.  If you have space inside the controller, tie a knot in the wires to prevent them from sliding out through the exit hole.  Connect the two wires to the two terminals.  It makes no difference which wire goes to each terminal, a resistor can’t tell the difference which way current is flowing.


13. Route the wires so that they do not interfere with any moving parts and out through the exit hole, slot, or whatever is there.
14. Replace any loose parts you removed in step 4.
15. Replace the insulating pad, if your controller has one.
16. Replace the bottom cover.
17. Connect to your sewing machine and Sew!

Ed