Another in the series of troubleshooting tips. Tips are not in order of most common to least common and do not need to be performed in sequence. Pick the easiest ones first and work to the more difficult ones. Not all tips will apply to all machines.
The lower thread lies straight on the underside of fabric and the upper thread appears there in form of loops or small knots.
1. Cause: The tension of the upper thread is too weak or the tension of the lower thread is too tight.
Solution: Tighten the tension of the upper thread, or loosen the tension of the lower thread, until the tensions of both threads are correctly balanced.
2. Cause: There are dirt, lint or pieces of thread between the Tension Discs.
Solution: Take apart the upper tension, clean the Tension Discs thoroughly, then replace the upper tension and adjust it correctly.
3. Cause: The upper thread has cut deep grooves into the Tension Discs.
Solution: Replace the defective Tension Discs with new ones.
4. Cause: The Bobbin Case is not threaded correctly. The Bobbin unwinds itself in the wrong direction.
Solution: Thread the Bobbin Case correctly.
5. Cause: The head of the Tension Adjusting Screw of the Bobbin Case protrudes too much and catches and retards the upper thread.
Solution: Adjust this screw correctly. If this condition continues to persist, smoothen the head of this screw with fine emery cloth or replace the defective screw with a new one.
6. Cause: The stitch hole in the Throat Plate or Feed Dog is too small.
Solution: Replace the Throat Plate or Feed Dog with one that has a larger stitch hole.
7. Cause: The point of the Needle is bent over ("hooked point").
Solution: Replace the defective Needle with a new one.
8. Cause: The Bobbin is not evenly wound. It unwinds itself irregularly.
Solution: Replace the Bobbin with one that is wound evenly.
9. Cause: The Bobbin is damaged or bent and does not revolve freely and evenly.
Solution: Replace the defective Bobbin with a new one.
10. Cause: Lint or dirt in the Bobbin Case prevents the Bobbin from revolving freely.
Solution: Remove all dirt from this part. Clean and dry thoroughly before replacing in the machine.
11. Cause: The needle is not correctly timed in relation to the Loop Taker (Hook).
Solution: Make certain that the Needle is pushed all the way up into the Needle Bar and held there firmly. Adjust the point of the Loop Taker in relation to the Needle. For "Timing" follow this general rule: The Needle must have risen about 3/32 of an inch from its lowest position at the moment the point of the Loop Taker is just at the center of the rising Needle. At this moment the point of the Loop Taker must be about 1/16 of an inch above the eye of the Needle.
12. Cause: There is insufficient clearance between the Bobbin Case Holder and the Bobbin Case Holder Position Bracket in horizontal axis Rotary Hook Machines. On vertical axis rotating hook types may be insufficient clearance between tab extending from Bobbin Case to the left and the notch at the underside of the Throat Plate.
Solution: Turn the machine by hand and observe where the upper thread gets caught.
Increase the clearance, where required, by carefully removing material from the component parts of the machine (by means of fine emery cloth). Smoothen the repaired portions with crocus cloth. The heaviest thread to be used must pass freely between these parts.
13. Cause: The mechanism for releasing the upper thread tension is incorrectly adjusted. It releases the tension of the upper thread too early.
Solution: Adjust this mechanism so that the tension of the upper thread is released only during the last moment of the upward motion of the Presser Bar Lifter.
14. Cause: The upper thread gets caught somewhere below the Throat Plate.
Solution: Examine Hook and Bobbin Case with regard to rough spots which may catch the upper thread and retard it, thus causing the loops on the underside of the fabric. Eliminate all rough spots with the aid of an oilstone or with fine emery cloth, and then polish these portions with crocus cloth or on a buffing wheel.
15. Cause: The Thread Take-up Spring (Check Spring) is not adjusted and does not work properly.
Solution: Adjust the Thread Take-up Spring until it has the correct tension and its upward motion is just finished at the moment the Needle enters the fabric.
Ed
Ed's Vintage Sewing Machine Shop
Monday, July 27, 2015
Tuesday, July 21, 2015
Ankers Aweigh!
Ankers Aweigh!
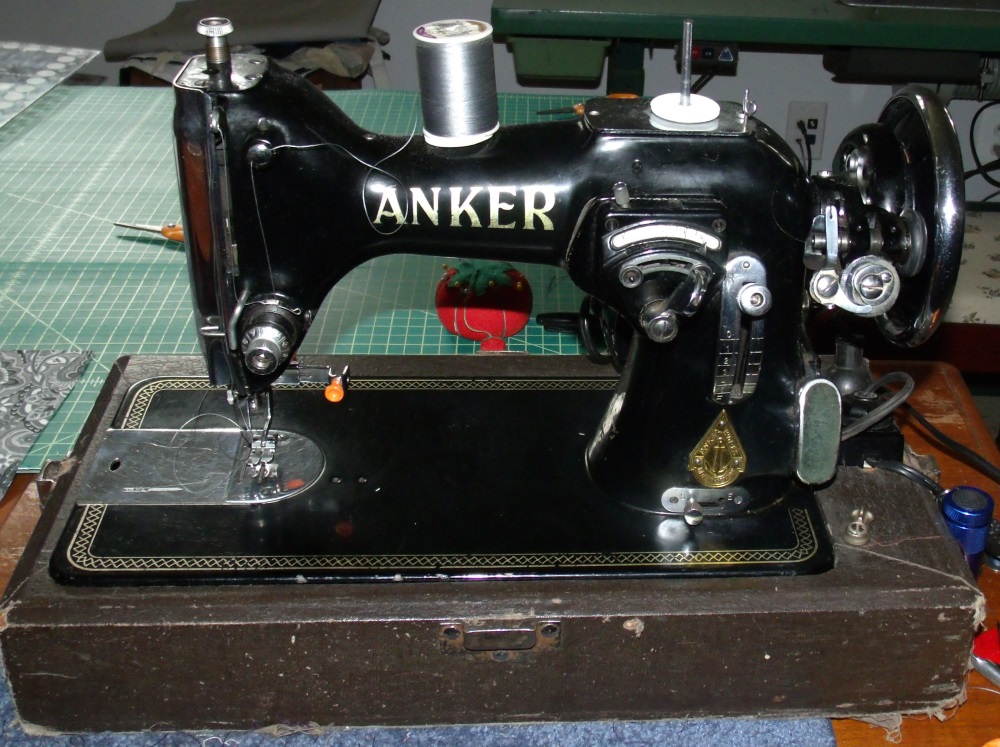
In my effort to downsize, I have been culling through my stock of sewing machines with an eye to disposing any that don't please me. I put this Anker RZ on the shelf years ago for some reason I couldn't remember and decided to break it out and make a final decision.

The machine had not been used in several years but I fired it up and sewed a test swatch. It sewed beautifully! I oiled it and sewed a larger project and find it to be one of the nicest machines I have ever used. It is smooth, quiet, and strong and sews everything I have put under the presser foot without complaining.
I received my new camera today and am now able to get some good photos and don't have to rely on old cell phones for pictures to post.
It's hard to read the badge but it says "ANKER WORKS BIELEFELD GERMANY".

Like all German sewing machines, it appears to be well-engineered and was probably an expensive machine in its day.

I particularly like the bobbin winder, it is designed like the old Singer winders with a finger that moves back and forth across the bobbin to ensure a smooth, even winding.

I haven't figured out what the pad is below the balance wheel, it is stationary and the only purpose I can imagine it could serve is as a pincushion.

That would keep owners from pinning a piece of fabric to the arm and scratching the paint with pins.
I think this one is a keeper, makes me want to dig out the Haid & Neu and give it a spin!
Ed
In my effort to downsize, I have been culling through my stock of sewing machines with an eye to disposing any that don't please me. I put this Anker RZ on the shelf years ago for some reason I couldn't remember and decided to break it out and make a final decision.
The machine had not been used in several years but I fired it up and sewed a test swatch. It sewed beautifully! I oiled it and sewed a larger project and find it to be one of the nicest machines I have ever used. It is smooth, quiet, and strong and sews everything I have put under the presser foot without complaining.
I received my new camera today and am now able to get some good photos and don't have to rely on old cell phones for pictures to post.
It's hard to read the badge but it says "ANKER WORKS BIELEFELD GERMANY".

Like all German sewing machines, it appears to be well-engineered and was probably an expensive machine in its day.

I particularly like the bobbin winder, it is designed like the old Singer winders with a finger that moves back and forth across the bobbin to ensure a smooth, even winding.

I haven't figured out what the pad is below the balance wheel, it is stationary and the only purpose I can imagine it could serve is as a pincushion.

That would keep owners from pinning a piece of fabric to the arm and scratching the paint with pins.
I think this one is a keeper, makes me want to dig out the Haid & Neu and give it a spin!
Ed
Friday, July 10, 2015
Signature URR277E :UPDATE
While trolling through thrift shops in the Harrisburg, PA area, I found a machine that had been eluding me for years.

The Montgomery-Ward Signature sewing machines were made by the HAPPY sewing Machine Company of Japan and I had been told that HAPPY made excellent machines and I wanted to see for myself.

Until last week, I had never found one in good enough condition at a price I was willing to pay. The hardest part was having to leave it in the car for the last three days of our vacation because I had no tools, cleaning supplies, or oil in the hotel room.
I was able to take the manual into the hotel room and peruse it and I noticed that this machine requires a cam to sew zig zag. I didn't notice a cam installed when I bought it and the machine came with no accessories. For the rest of our trip, I was thinking of alternatives - would a Singer 306/319 cam fit? probably not. Could I manufacture a cam from Lucite? Maybe. How would I determine the dimensions? All my worrying was in vain because when I opened the lid on arriving home, I saw the zig zag cam installed. There are other cams but I would never use them, all my sewing is straight stitch and occasional zig zag to form a buttonhole.
When I got the machine on the bench, the first problem I noticed was that the tension discs did not release when the presser bar was lifted. A quick look inside the cover showed that the tension release pin was missing. This is a bad sign because it indicates that the tension has been disassembled by someone who did not know how to reassemble it. As I would expect, none of my salvaged pins was the correct length and I had to manufacture one from a finish nail.
When I had the tension assembly removed to install the tension release pin, I noticed that there was no check spring.

I have tinkered with a lot of tension assemblies and seen very few that do not have a check spring, so I consulted the manual. Sure enough, the diagram of the machine clearly shows a check spring.

Apparently the check spring broke and the person who disassembled the tension replaced it with a slightly different spring.

The new spring was too long and pushed the tension discs beyond the slot for the thread so the thread sat behind the discs, rather than between them. I did have a salvaged check spring but had to modify it to make it fit correctly.
The motor belt slipped on startup several times but the belt was tight enough and the machine was loose enough that it should not have had that problem. Several yards of thread had wrapped around the motor pulley, lifting the belt out of the v-groove so it did not have enough contact to drive the balance wheel.

With those problems corrected, I threaded it up and tried to sew.
- On the first pass, NOTHING! The needle would not even bring up the bobbin thread. The needle bar was about 1/4" too high and the hook didn't come close to the eye of the needle to catch the upper thread.
- On the second pass, straight stitch worked fine but zig zag only made a stitch on zig, not on zag.


- Lowered the needle bar a bit more and zig worked every stitch but zag skipped every now and again.

- Finally, after the third needle bar height adjustment, zig zag and tension are both perfect.

Now to find a project to sew.
UPDATE: It turned out that the needle bar was not too high. There is a screw in the back of the needle bar

The end of the screw's shaft is in the slot where the needle sits.

The purpose of that screw is to set the exact place where the needle sits in the needle clamp. I didn't notice that screw was missing and installed the needle too high up in the needle bar, giving the effect of the needle bar too high in its clamp. Fortunately, I had one of those screws in my parts bin and was able to fix the problem. Then, it was a matter of re-setting the needle bar to the correct height.
I apologize for the crappy photos, all my cameras are broken and I'm using my daughter's old cell phone as a camera until I find a camera I like.

The Montgomery-Ward Signature sewing machines were made by the HAPPY sewing Machine Company of Japan and I had been told that HAPPY made excellent machines and I wanted to see for myself.

Until last week, I had never found one in good enough condition at a price I was willing to pay. The hardest part was having to leave it in the car for the last three days of our vacation because I had no tools, cleaning supplies, or oil in the hotel room.
I was able to take the manual into the hotel room and peruse it and I noticed that this machine requires a cam to sew zig zag. I didn't notice a cam installed when I bought it and the machine came with no accessories. For the rest of our trip, I was thinking of alternatives - would a Singer 306/319 cam fit? probably not. Could I manufacture a cam from Lucite? Maybe. How would I determine the dimensions? All my worrying was in vain because when I opened the lid on arriving home, I saw the zig zag cam installed. There are other cams but I would never use them, all my sewing is straight stitch and occasional zig zag to form a buttonhole.
When I got the machine on the bench, the first problem I noticed was that the tension discs did not release when the presser bar was lifted. A quick look inside the cover showed that the tension release pin was missing. This is a bad sign because it indicates that the tension has been disassembled by someone who did not know how to reassemble it. As I would expect, none of my salvaged pins was the correct length and I had to manufacture one from a finish nail.
When I had the tension assembly removed to install the tension release pin, I noticed that there was no check spring.

I have tinkered with a lot of tension assemblies and seen very few that do not have a check spring, so I consulted the manual. Sure enough, the diagram of the machine clearly shows a check spring.


The new spring was too long and pushed the tension discs beyond the slot for the thread so the thread sat behind the discs, rather than between them. I did have a salvaged check spring but had to modify it to make it fit correctly.
The motor belt slipped on startup several times but the belt was tight enough and the machine was loose enough that it should not have had that problem. Several yards of thread had wrapped around the motor pulley, lifting the belt out of the v-groove so it did not have enough contact to drive the balance wheel.

With those problems corrected, I threaded it up and tried to sew.
- On the first pass, NOTHING! The needle would not even bring up the bobbin thread. The needle bar was about 1/4" too high and the hook didn't come close to the eye of the needle to catch the upper thread.
- On the second pass, straight stitch worked fine but zig zag only made a stitch on zig, not on zag.

- Lowered the needle bar a bit more and zig worked every stitch but zag skipped every now and again.

- Finally, after the third needle bar height adjustment, zig zag and tension are both perfect.

Now to find a project to sew.
UPDATE: It turned out that the needle bar was not too high. There is a screw in the back of the needle bar
The end of the screw's shaft is in the slot where the needle sits.

The purpose of that screw is to set the exact place where the needle sits in the needle clamp. I didn't notice that screw was missing and installed the needle too high up in the needle bar, giving the effect of the needle bar too high in its clamp. Fortunately, I had one of those screws in my parts bin and was able to fix the problem. Then, it was a matter of re-setting the needle bar to the correct height.
I apologize for the crappy photos, all my cameras are broken and I'm using my daughter's old cell phone as a camera until I find a camera I like.
Subscribe to:
Posts (Atom)