Wednesday, July 31, 2013

Auction 201 Update

Progress has been slow on the 201 because we are gearing up for craft show season. I spend the majority of my spare time making wrist wallets and table runners and get very little time to tinker with sewing machines.

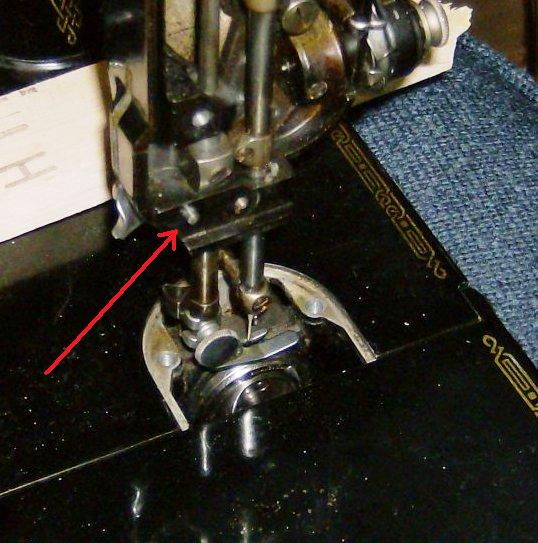
I learned that the bobbin winder kickout spring is broken and the bobbin winder rests on the balance wheel all the time.  I didn't have a spare spring but they are available on the internet for $4.25 plus shipping or $9.99 with free shipping.  The price was a little bit of a deterrent, since I only paid $12 for the machine, I hesitated to spend another $10 on a measly little spring but the  major issue was that I would have to wait for it to be shipped.  The spring is a very simple affair, just three coils of spring wire with a bend on one end and a 1.25" leg on the other so I surfed the internet for instructions how to make a spring.  Lowe's sells a package of four assorted sizes of spring wire for $2.98 and I picked up a pack.


. Each piece is only 6 inches long and I needed 4.5 inches for the spring, Knowing I would only get one shot, I got some fishing tackle with piano wire at Wal-Mart to make some prototypes by winding the wire around a bolt..  


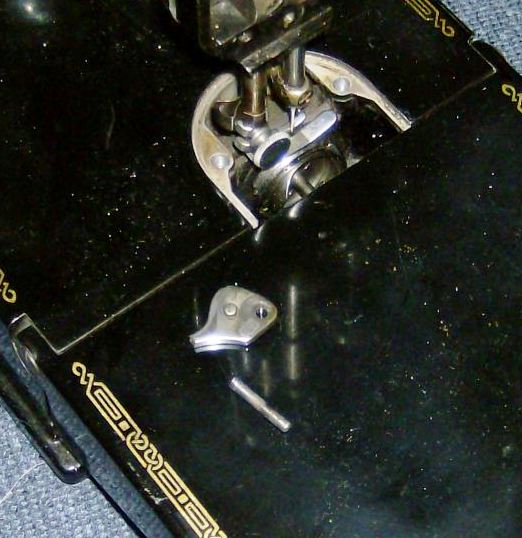
  The fourth prototype fit but the piano wire is not strong enough to keep the bobbin winder suspended when the machine starts running. This evening, I made a spring using the Lowe's spring wire and it works fine.
  While unsuccessfully searching my spare parts boxes for a kickout spring, I encountered a stroke of good luck - I found a 201 terminal block!  I was already prepared to manufacture a box to contain the light switch but the switch I got at Lowe's fits just fine in the 201 terminal block.  I got this box of 201 parts about 20 years ago from a lady who had parted out some 201s and wanted to reclaim some space in her garage. That's why I hate to throw anything out, you never know when you might need it.
 

  I was pleasantly surprised when I installed a fresh needle and the machine made an almost perfect stitch on the first try.  A little tweaking of the upper and lower tensions and it now sews like a Singer 201 should. 

 When it's running, it still has a little buzz that shouldn't be there but seems to be lessening with use.  If it doesn't go away soon, I will break out my mechanic's stethoscope and track down the source.  Here's the almost-finished product.


Now that I see the photos, it appears I still need to do some more cosmetic restoration (cleaning). Honestly, it looks better in person.

Monday, July 29, 2013

Garage Find - Domestic

I bet you think I meant "Garage SALE Find" but it's not. Yesterday, I was cleaning out my garage and saw a sewing machine case behind some plywood leaning against the wall. I thought it was just an empty case but it turned out to have a Domestic sewing machine in it.


  My daughter found this machine at a thrift shop for $8 and picked it up for me as a gift.  I cleaned and oiled it when I got it but haven't used it since.  We have lived in this house for three years and it has been stored on the floor of the garage all that time but when I plugged it in, it ran as smooth and quiet as a Necchi.  With the left-needle position and having an end-loading bobbin,  I put it early in the zig zag era, probably late 1950s or early 1960s.

  I'm curious what was sewn on it previously because most of the paint is in good condition but there is a big chunk and several chunklets missing from the vertical pillar, inside the throat. What could cause that type of damage?


  I used the machine for a project last night and the only problem is that the motor does not start immediately when depressing the foot control. Thinking this might be caused by corrosion in the foot control, I opened it up and cleaned the contacts but that did not cure the problem.


  Next, I pulled off the end cover to make sure the belt was not too tight but it wasn't.  The mechanics are free moving, so it doesn't need lubrication, I guess my next move will be to pull out the motor and check for dirt on the commutator.

Tuesday, July 16, 2013

Singer 201

There is an auction held about 20 miles from here every Friday. The auction house has a website where they post photos of items in the upcoming auction. I saw this picture


and knew from the potted motor, lack of tension on the end cover, and light shade that this was a 201 and there was also a 66 Redeye in the same auction. Now, I have too many straight stitch machines but I REALLY like the 201 and I need a Redeye to install in my parlor cabinet so I headed to the auction.

I had figures in mind for both machines before I went to the auction but when I got there, I saw that the 201 was missing the terminal block


 and part of the tension assembly,


 so my mental number decreased. I should have tipped it over and seen the rust underneath but didn't want to appear too interested.  When the bidding was over, I walked away with it for the princely sum of $12.

The wires are hooked directly to a two-prong plug so as soon as the plug is energized, the light comes on and the motor runs full speed.  I don't believe anyone sewed on it that way.


Surprisingly, the motor did run and the needlebar went up and down, so I set to cleaning and lubing.  A few squirts of oil and the speed increased but the machine was quite noisy for a 201. One look at the gears told me why - they were totally dry, looked like they had never been greased.


  I spent an enormous amount of time trying to remove one of the rusted screws holding the cover over the gear set below the hook. I used liquid wrench, heat, vibration and finally ended up drilling the last screw out.

The terminal block is going to be a challenge. I have a terminal block from some machine I stripped in the past but it doesn't have the box for the light switch.  Lowe's carries a switch that looks very much like the original (although silver vice white) with enclosed wiring.


 I will need to fashion an 'L' bracket to mount under the terminal block to hold the switch.

 I didn't stay at the auction long enough to bid on the Redeye. The photo showed just a table top and the sewing head but when I got there, it included the rest of the treadle stand and cabinet - all in pieces - so I thought the price might go higher than I was willing to pay. Besides, it was going to be one of the last things to go up for bids and I didn't feel like waiting that long.

Here is one of the photos for this Friday's auction. In the early days, I would have been salivating all week but now, I think I'll skip this week unless something more interesting comes along.


Much of my collection has come from local auctions. Probably the best was a nice Pfaff 130 in a cabinet with the chair for $5! I love local auctions.

Sunday, July 14, 2013

Singer Featherweight Presser Lift Lever

One of the Featherweights I bought off Ebay had a broken lever to lift the presser foot. Thinking this would be an easy fix, I set out to remove the old stub and cannibalize a good lever from a parts machine. I could see that the lever was held in by a pin or a screw but could not get it to move if it was a pin and could not find a slot to fit a screwdriver if it was a screw. Not wanting to damage the machine, I asked the experts on one of the vintage sewing machine forums and learned it was a pin and it had to be driven out from the back side. Easier said than done because there is no room in that minuscule throat to swing a hammer and the pin wouldn't budge from the measly little taps I was able to provide.

So, I thought, "how can I apply pressure to drive out the pin without a hammer?" My solution was a wheel puller in reverse.


Using a nail set to push the pin and a 'C' clamp to provide the pressure, I was able to push the pin out far enough to grab it with a pair of pliers and removed the broken lever.


I had intended to rob the new lever from another machine but decided to check our sewing machine parts distributor and learned that replacement levers are available without disabling another machine.


I haven't yet installed the new part but don't expect the installation to be as confusing as the removal.

Friday, July 12, 2013

Brother 220 Super Streamliner

  A friend picked this machine up at a local thrift shop. It was not out on the sales floor, it was out back being used as a doorstop. The dark pink/light purple color caught her eye immediately and she had to have it.


  She brought the machine into the shop last weekend because she had dropped it and the balance wheel turned so tightly that the motor was not strong enough to rotate it. After a quick inspection for bent rods and shafts, we noticed that the balance wheel wobbled when turned by hand. The gap between the edge of the balance wheel and the housing was about ¼ “ at its closest and about 3/8” when turned 180 degrees. This usually means that the tail of the main shaft is bent and binding on the rear bushing.


  I straightened the shaft and the machine runs as smooth and quiet as new. I purposely didn’t take photos of the shaft straightening process because I don’t want to be responsible for someone damaging their antique machine beyond repair because my directions weren't clear enough. I don’t see any youtube videos of the process, probably for the same reason. If you think you have that problem, gmail me at oldsewingmachines and I will try to talk you through it. 

Monday, July 08, 2013

Simplex


  I picked this machine up at the dump over a year ago.  The cosmetic condition and complete decals caught my eye and I tossed into my minivan. The attendant assured me that the facility has an unbeatable return policy. I plugged it in when I got home and learned that it was very noisy and did not sew. I didn't have time to fuss with it then and put it on the shelf and forgot about it. Yesterday, I pulled it out, hoping I could find it non-repairable and use its disposal to lower the size of my collection (hoard?)


The badge says Simplex Sewing Machine Company, Washington DC but tucked inconspicuously under the motor is, "Made in Occupied Japan". That places it's manufacture date between 1945 and 1952 and from some of the features, I would place it towards the end of that period.


I can't find a JA Number, but "TSM" is cast into the under side of the bed. If anyone knows what that means, please comment (Toyota Sewing Machines?) Toyota began producing 15 Class sewing machines in 1946, according to their website, so it's altogether possible that this machine was made in their factory.

Many things were wrong with this one! The only things I was surprised to find in perfect adjustment were the needlebar height and the thread gap between the shuttle driver and the shuttle. There is no shuttle cushion spring on this model, so the shuttle can become noisy fast if that gap is not correctly adjusted.

1. There is a roller in the feed dog circuit, just above the hook assembly. It was frozen and the follower was sliding, rather than rolling. 


2.  The upper tension was assembled incorrectly.
3.  The check spring was bent totally out of shape.
4.  There was so much lint packed between the rows of teeth on the feed dog that the feed dog could no longer rise high enough to feed the fabric.
5.  The feed dog height was out of adjustment (possibly because of #4 above).
6.  The feed dog was not centered in the slot.
7.  There were several loose mechanical connections and pivot points. One in the feed dog circuit made the stitch length lever vibrate when sewing.
8.  The motor was so dry, it chattered when running.

Every defect corrected just led me to another, a very fun afternoon.

I will probably never get rid of this one, no one seems to want vintage sewing machines that don't come from one of the big manufacturers - Singer, Bernina, Pfaff, Necchi, etc. but it gave me an afternoon of satisfying tinkering, I didn't have to replace any parts except the bobbin case, and I can always return it to where I got it.


Wednesday, July 03, 2013

Learning About Vintage Sewing Machines


Ali P asked, “How can I learn how to fix up these beauties?” I have a fairly extensive library of sewing machine-related books and, to be honest, none of them has been of much help. They only hit the high spots for a very few specific machines and the high spots they hit always seem to be not what I am having trouble with or for a different machine than I have on the bench. I obtained a copy of “Sincere’s sewing Machine Service Manual” from my local library. Check there, you might be able to score a free copy of that or Hutchison’s manual but if you have to pay anything, it’s not worth the price in my opinion. 


As with learning anything, you have to start with the basics and hands-on is better than just reading a book. With that in mind, here is Ed’s method for learning vintage sewing machine repair:

1. Start with a Singer straight stitch machine, they plentiful and cheap and parts and documentation are readily available. Scout around for a model 15, 66, 99, or 185 that is complete and has no rust. First scour all your relatives and acquaintance's basements for a freebie. If that doesn't yield results, keep an eye on local thrift shops, local classified ads, craigslist, yard sales, and local auctions and flea markets.  If you pay more than $30, you got cheated. The balance wheel should spin but, if not, use that fact to talk down the price. I have paid as little as $5 at a local auction and $2.50 at an antique store that was trashing the heads to make tables out of the treadle cabinets.


2. Go to singerco.com and download the free instruction manual, so you know how to use the machine, then go to parts.singerco.com and download the free service manual – sometimes called adjuster’s manual. For 15 Class machines, I recommend the 15-91 manual in the “Instruction Manuals” section and for 66 Class machines (66, 99, 185), the 66 manual in the “Instruction Manuals” section. I have a re-typed version of the 66 Adjuster's Manual in pdf format with a few added procedures, like disassembly of the tension assembly. If you would prefer that to the Singer download, I am oldsewingmachines at gmail.

3. Clean all the fuzz bunnies out from under the needle plate and remove all the covers and oil the machine. Disregard the oiling diagram in the manual, with oiler in hand, rotate the balance wheel and put a drop of sewing machine oil at every point where metal rubs against metal. Run the machine at full speed until the new oil is worked in and your baby is purring. At this point, you might even want to install a fresh needle and see if the machine will make a stitch. If it does, don't be tempted to stop there - just because it sews doesn't mean it sews as well as it should.

4. Now, get out the service manual (adjuster’s manual) and go cover-to-cover, checking every adjustment in the book – needle bar height, feed dog height, feed dog centering, tension assembly, bobbin winder, hook timing, hook-to-needle clearance, drive belt tension, check spring, and all the gaps that thread must pass through on its way to making a stitch. No special tools are needed, you should have all you need lying around the house.

5. After making any necessary adjustments, you should now have a vintage Singer sewing machine that runs and sews like new and you know why it does. If you have gone through all the above steps and your machine does not sew, perform a search for “vintage sewing machine forum” and join one of the many forums where SM collectors hang out. They are all anxious to show how much they have learned and willingly answer questions within minutes. You will be more credible if you can tell what you have already tried that didn't fix the problem.

Rusty the Singer Featherweight

Remember this Featherweight?  Frozen solid and rust on every component 2" from the bottom.


After I gave the owner an estimate for a new motor, new hook assembly and new bobbin case, she decided not to have it repaired and it has been sitting in the shop for almost two months waiting for her to pick it up. Friday, I called her to remind her it was there and she told me if I could use any parts from it to keep it.  While it would be prohibitively expensive to rebuild it, the body is nice and all the exterior components (bobbin winder, spool pin, tension) and the foot control and power cord are all in usable condition, so I was tickled silly.

Of course, the tinkerer in me would not be satisfied to just start ripping off parts and I decided to see if I could get the machine to sew again. Hours of soaking the shaft in Liquid Wrench finally got the motor to break loose and Liquid Wrench/sewing machine oil also got the mechanical parts to spin freely again.

But, a Featherweight won't sew without a smooth hook and this hook had lots of rust on it.


The hook needed to be removed and disassembled for cleaning but the setscrews securing the hook to the shaft were some of the more corroded pieces. It took lots of LW to break them free and I made so many attempts that the screws were damaged and had to be replaced.


I wish I had taken photos of my hook cleaning attempts, I removed it three times to clean, smooth, and polish and, after borrowing a bobbin case from another machine, finally have a half-decent stitch forming. The machine is still not ready for prime time, it has to be started by hand if it sits overnight, isn't running as fast as it should, and is noisier than a Featherweight should be. It will take some more fiddling to make it right, if it ever can be made right.